Food, Games, Photos, and stuff that isn't any of those things

Category: Thanksgiving

Thanksgiving Recipes – Turkey, Cranberries, and Mashed Potato Waffles

Dry Brined, Sous Vide, Deep Fried Turkey Recipe

Dry Brined, Sous Vide, Deep Fried Turkey

Dry Brined, Sous Vide, Deep Fried Turkey

Adapted from recipes by Alton Brown and Michael Voltaggio.

Recipe for a ~14 pound turkey. Scale as necessary if adding additional turkeys or turkey parts.

Dry Brine ingredients (via Alton Brown):

  • 3 1/2 tbsp kosher salt
  • 1/ 1/2 tsp rubbed sage
  • 1 1/2 tsp dried thyme
  • 1 1/4 tsp whole black peppercorns
  • 1/2 tsp whole allspice berries

Turkey

  • ~14 pound turkey
  • 1 1/2 cups duck fat
  • 6 large slices of orange peel, from 1 – 2 oranges
  • 6 sprigs fresh thyme
  • 6 sprigs fresh sage leaves
  • Oil for deep frying (~6 gallons)

Equipment

  • Spice Grinder or mortar and pestle
  • Sous vide setup – immersion circulator and bath or other home made solution
  • Vacuum sealer and bags or large ziploc bags
  • Turkey Fryer or other deep fryer

4 to 5 days before serving

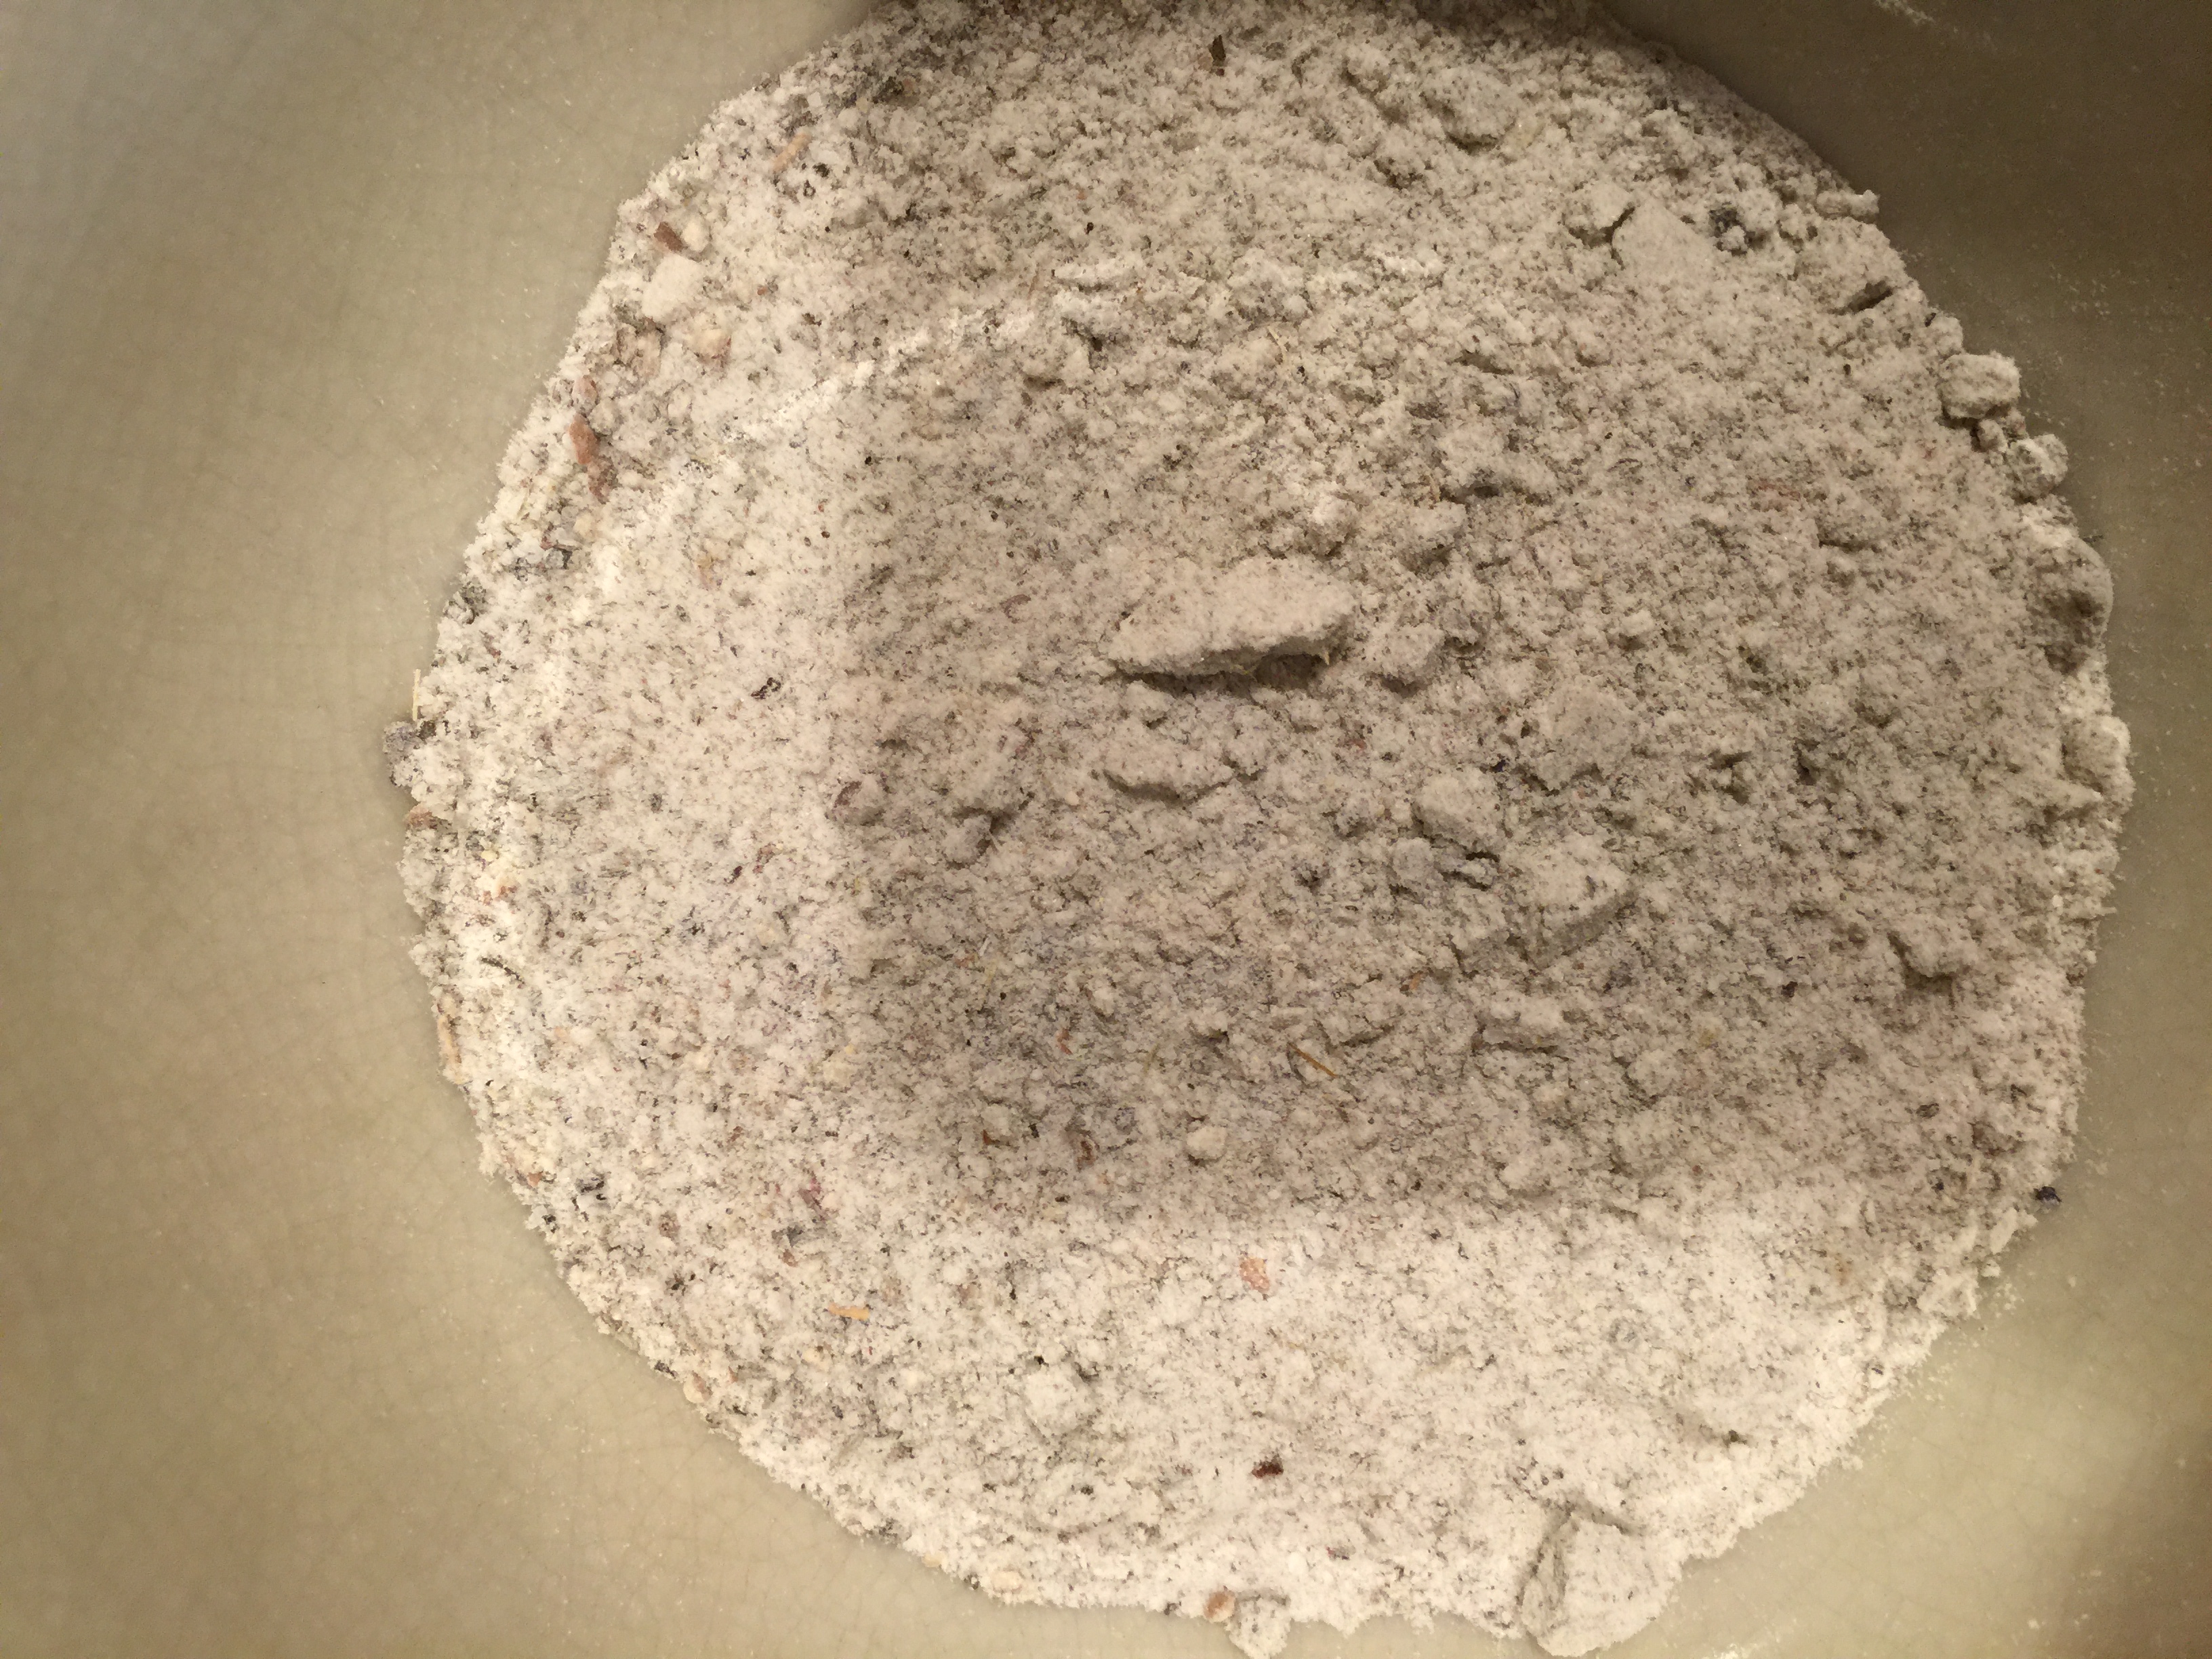
Combine all dry brine ingredients in a spice grinder or mortar and grind into a coarse powder. Set aside.

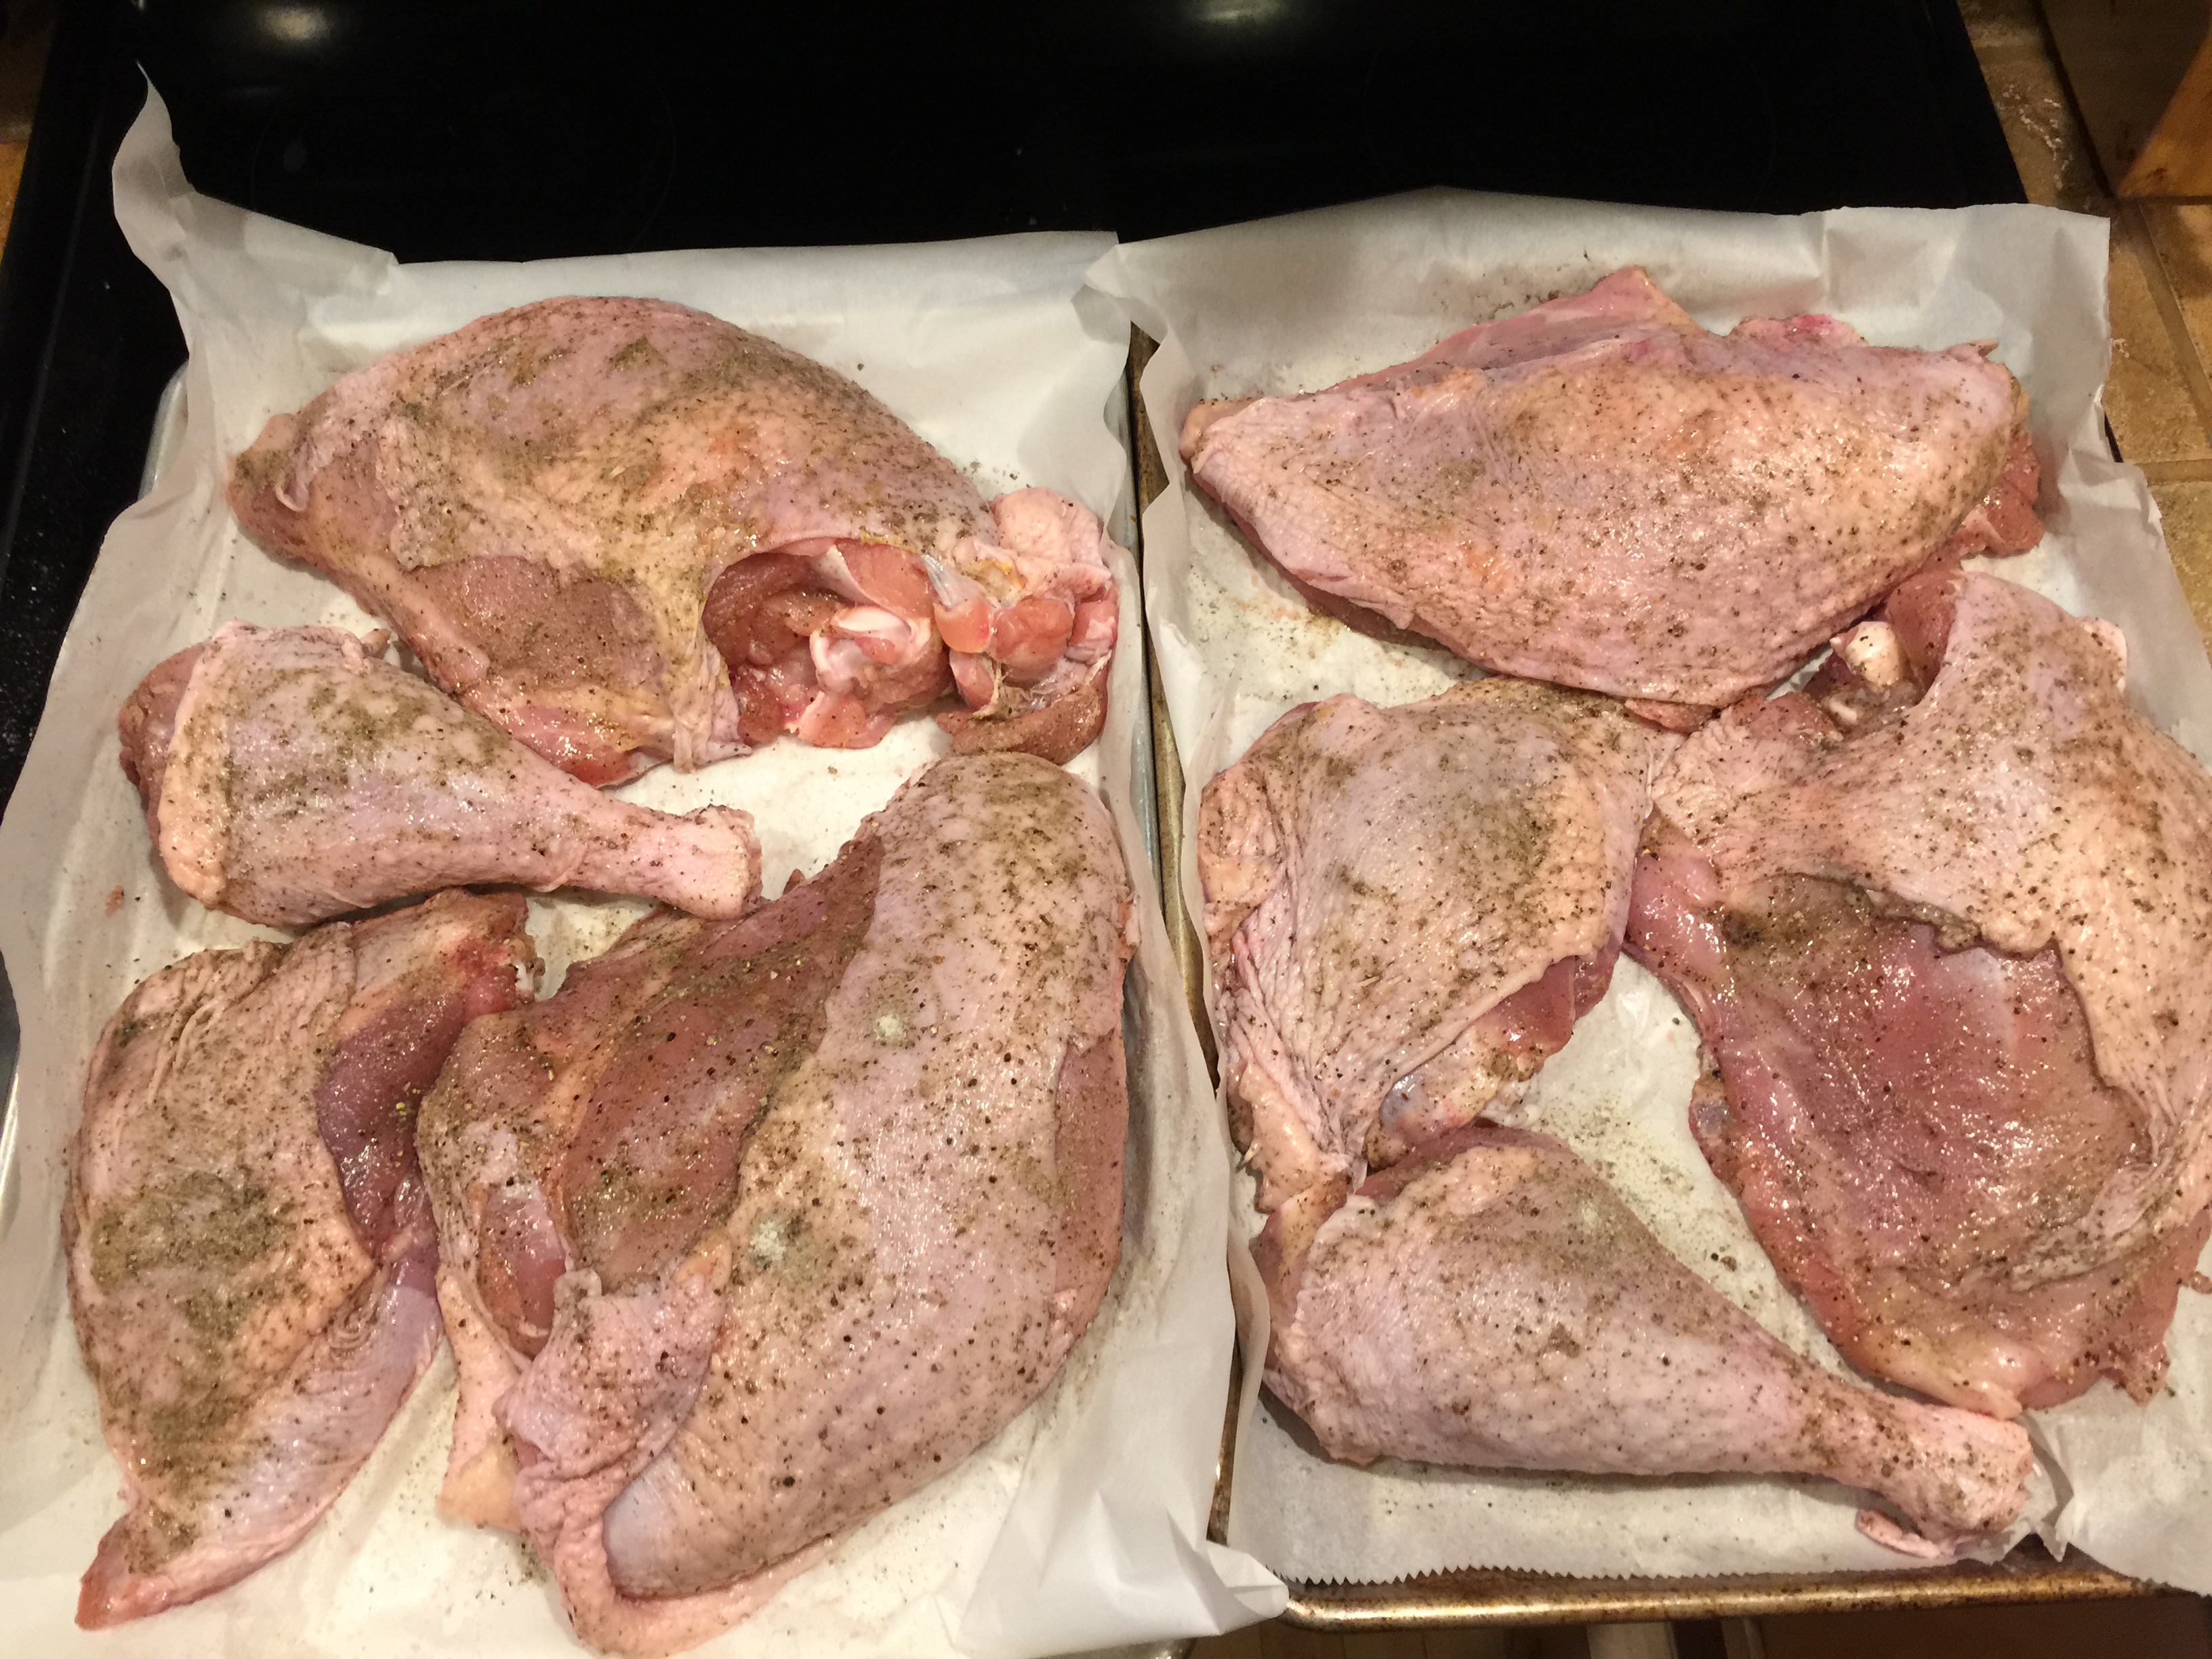
Disassemble the turkey into individual parts. If you’re unfamiliar with the process, a good video can be found here. Reserve wings and back for making turkey stock or gravy.

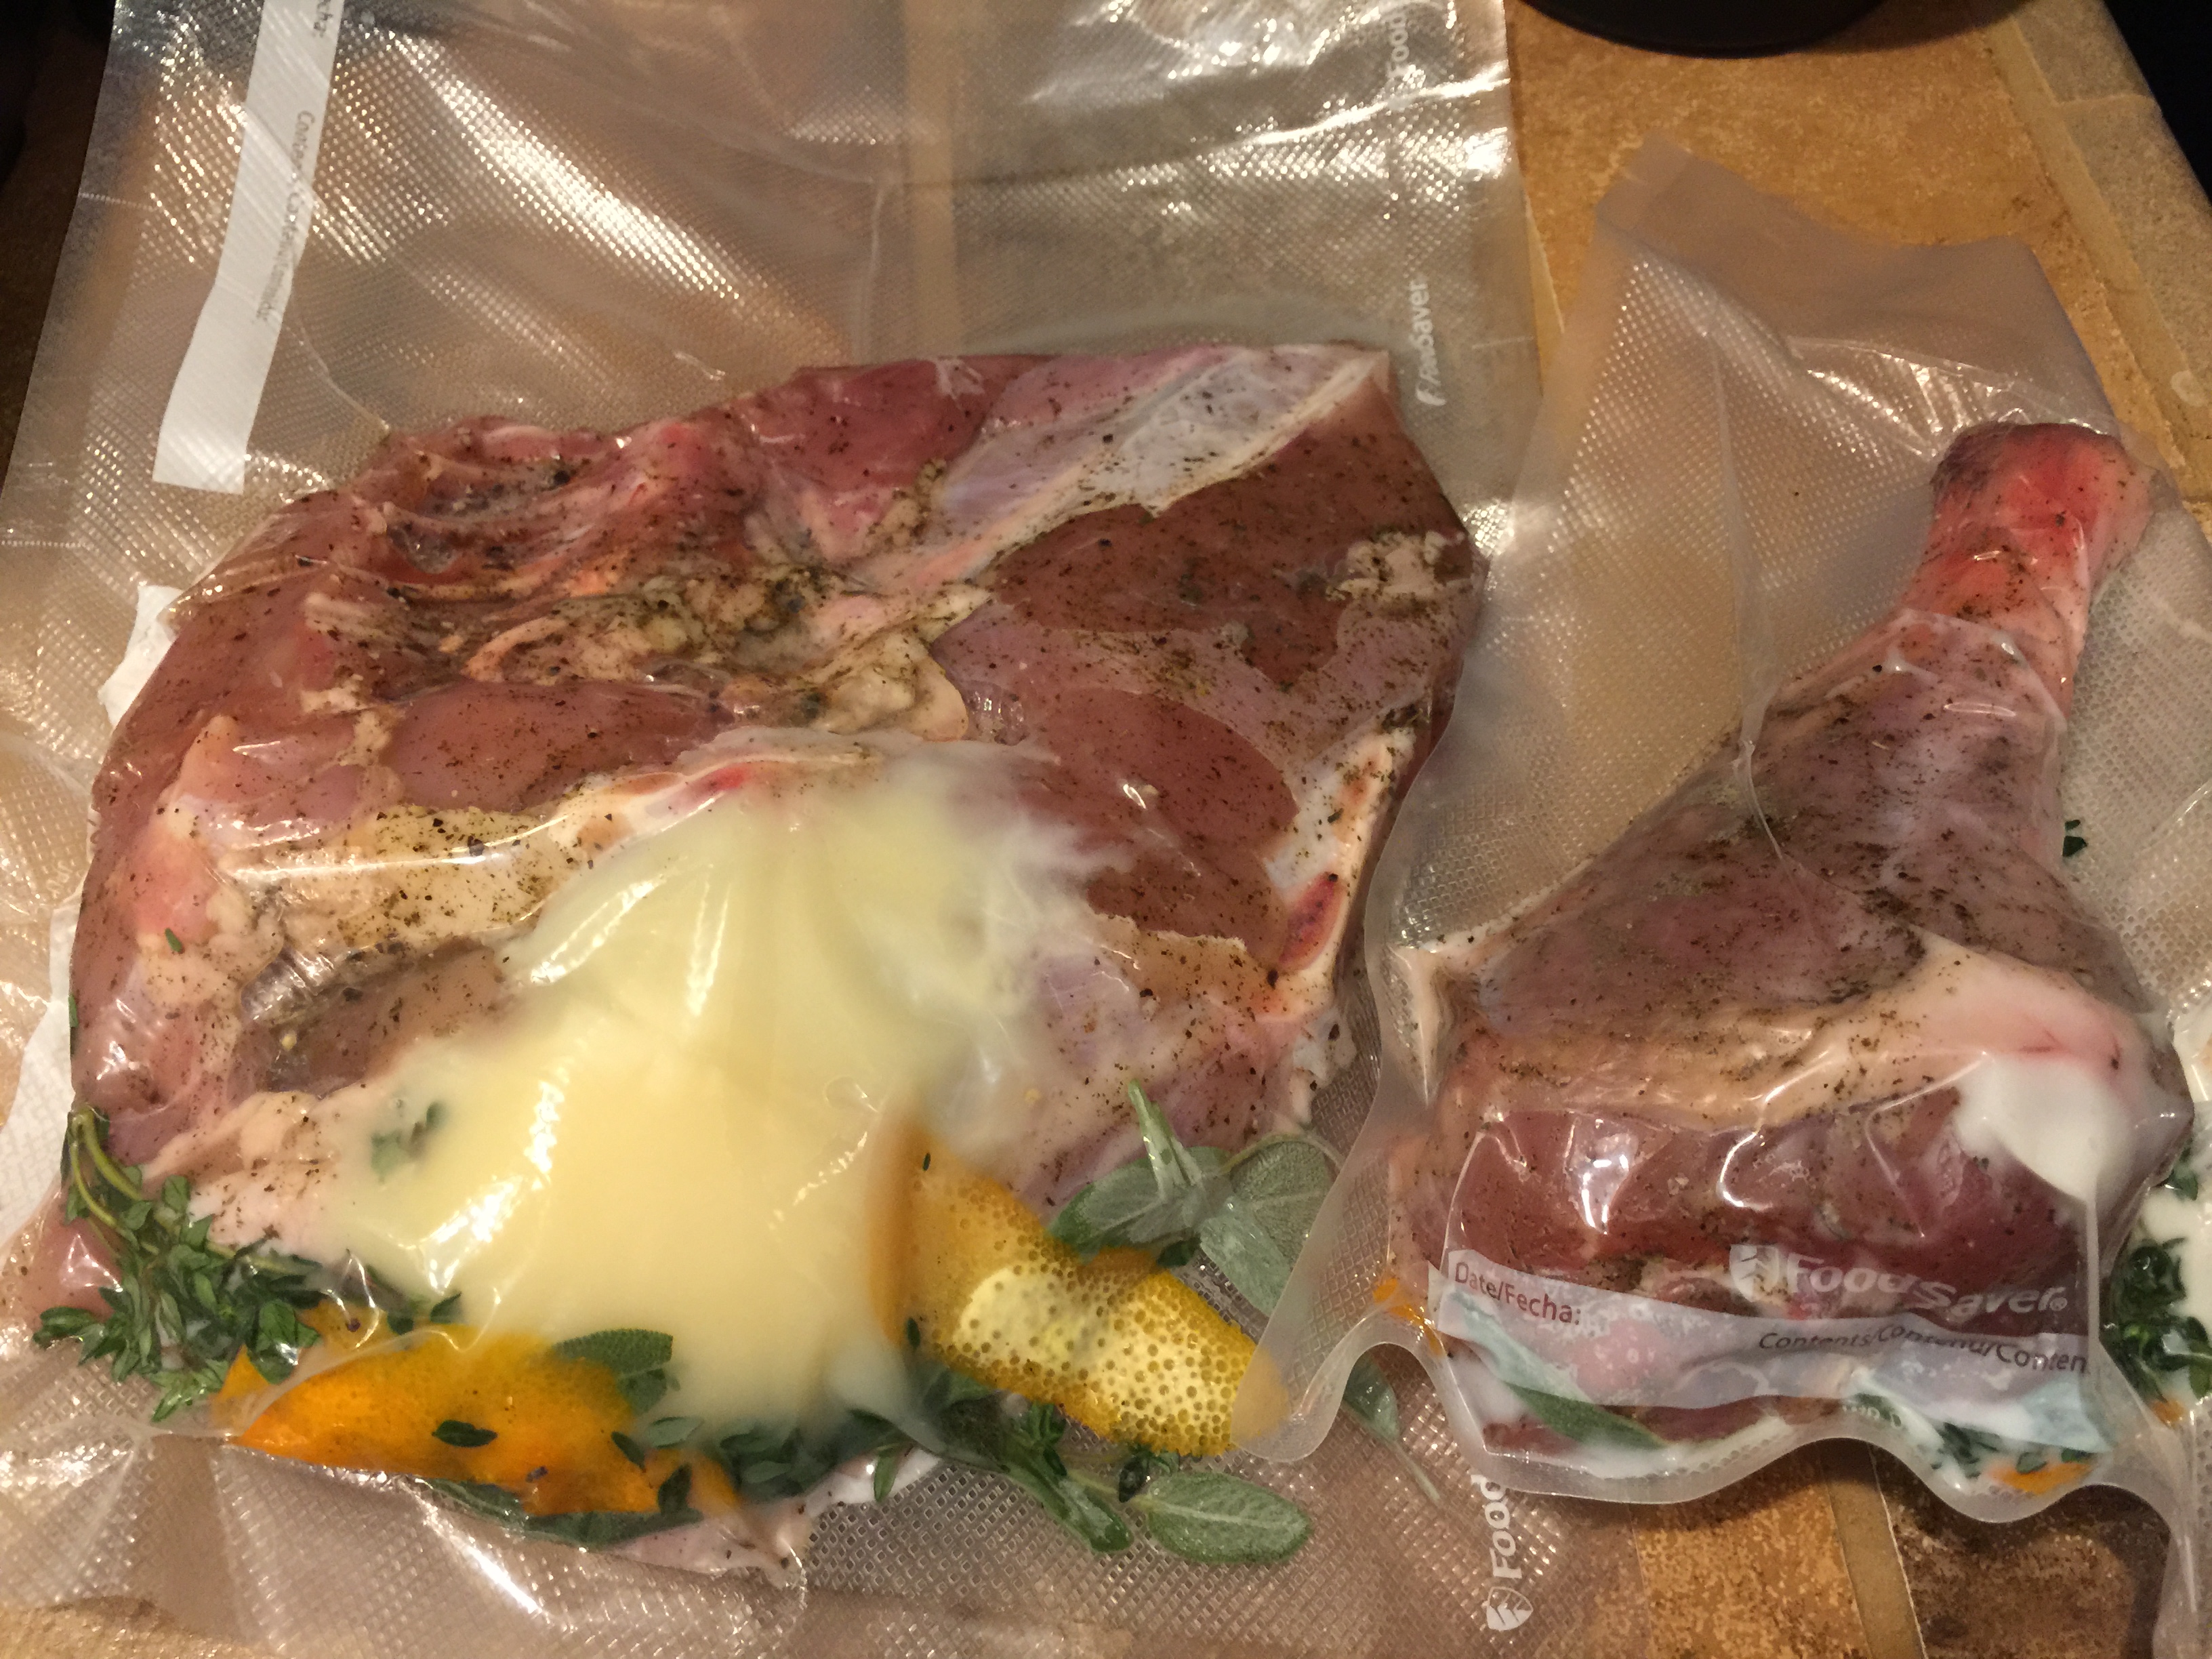
Arrange the breasts, thighs, and legs on two parchment paper lined sheet pans, leaving some space between each piece, and thoroughly dust each piece on both sides with the dry brine mixture. Store in the refrigerator, uncovered, for 4 days.

Day before or day of serving

Setup your sous vide rig to cook at 150F/65.5C.

Remove the dry brined turkey parts from the refrigerator. Place each turkey piece in a vacuum seal bag, along with 1/4cup of duck fat, 1 strip of orange peel, 1 sprig of thyme, and 1 sprig of sage leaves. Seal with a vacuum sealer. Place the breasts and legs back in the refrigerator.

  • If using ziploc bags instead of vacuum seal bags, use the water displacement method to remove air from the bags before cooking. To do this, seal the bag most of the way, then push the bag underwater until all but the seal is submerged. This will force out almost all of the air. Completely seal the bag.

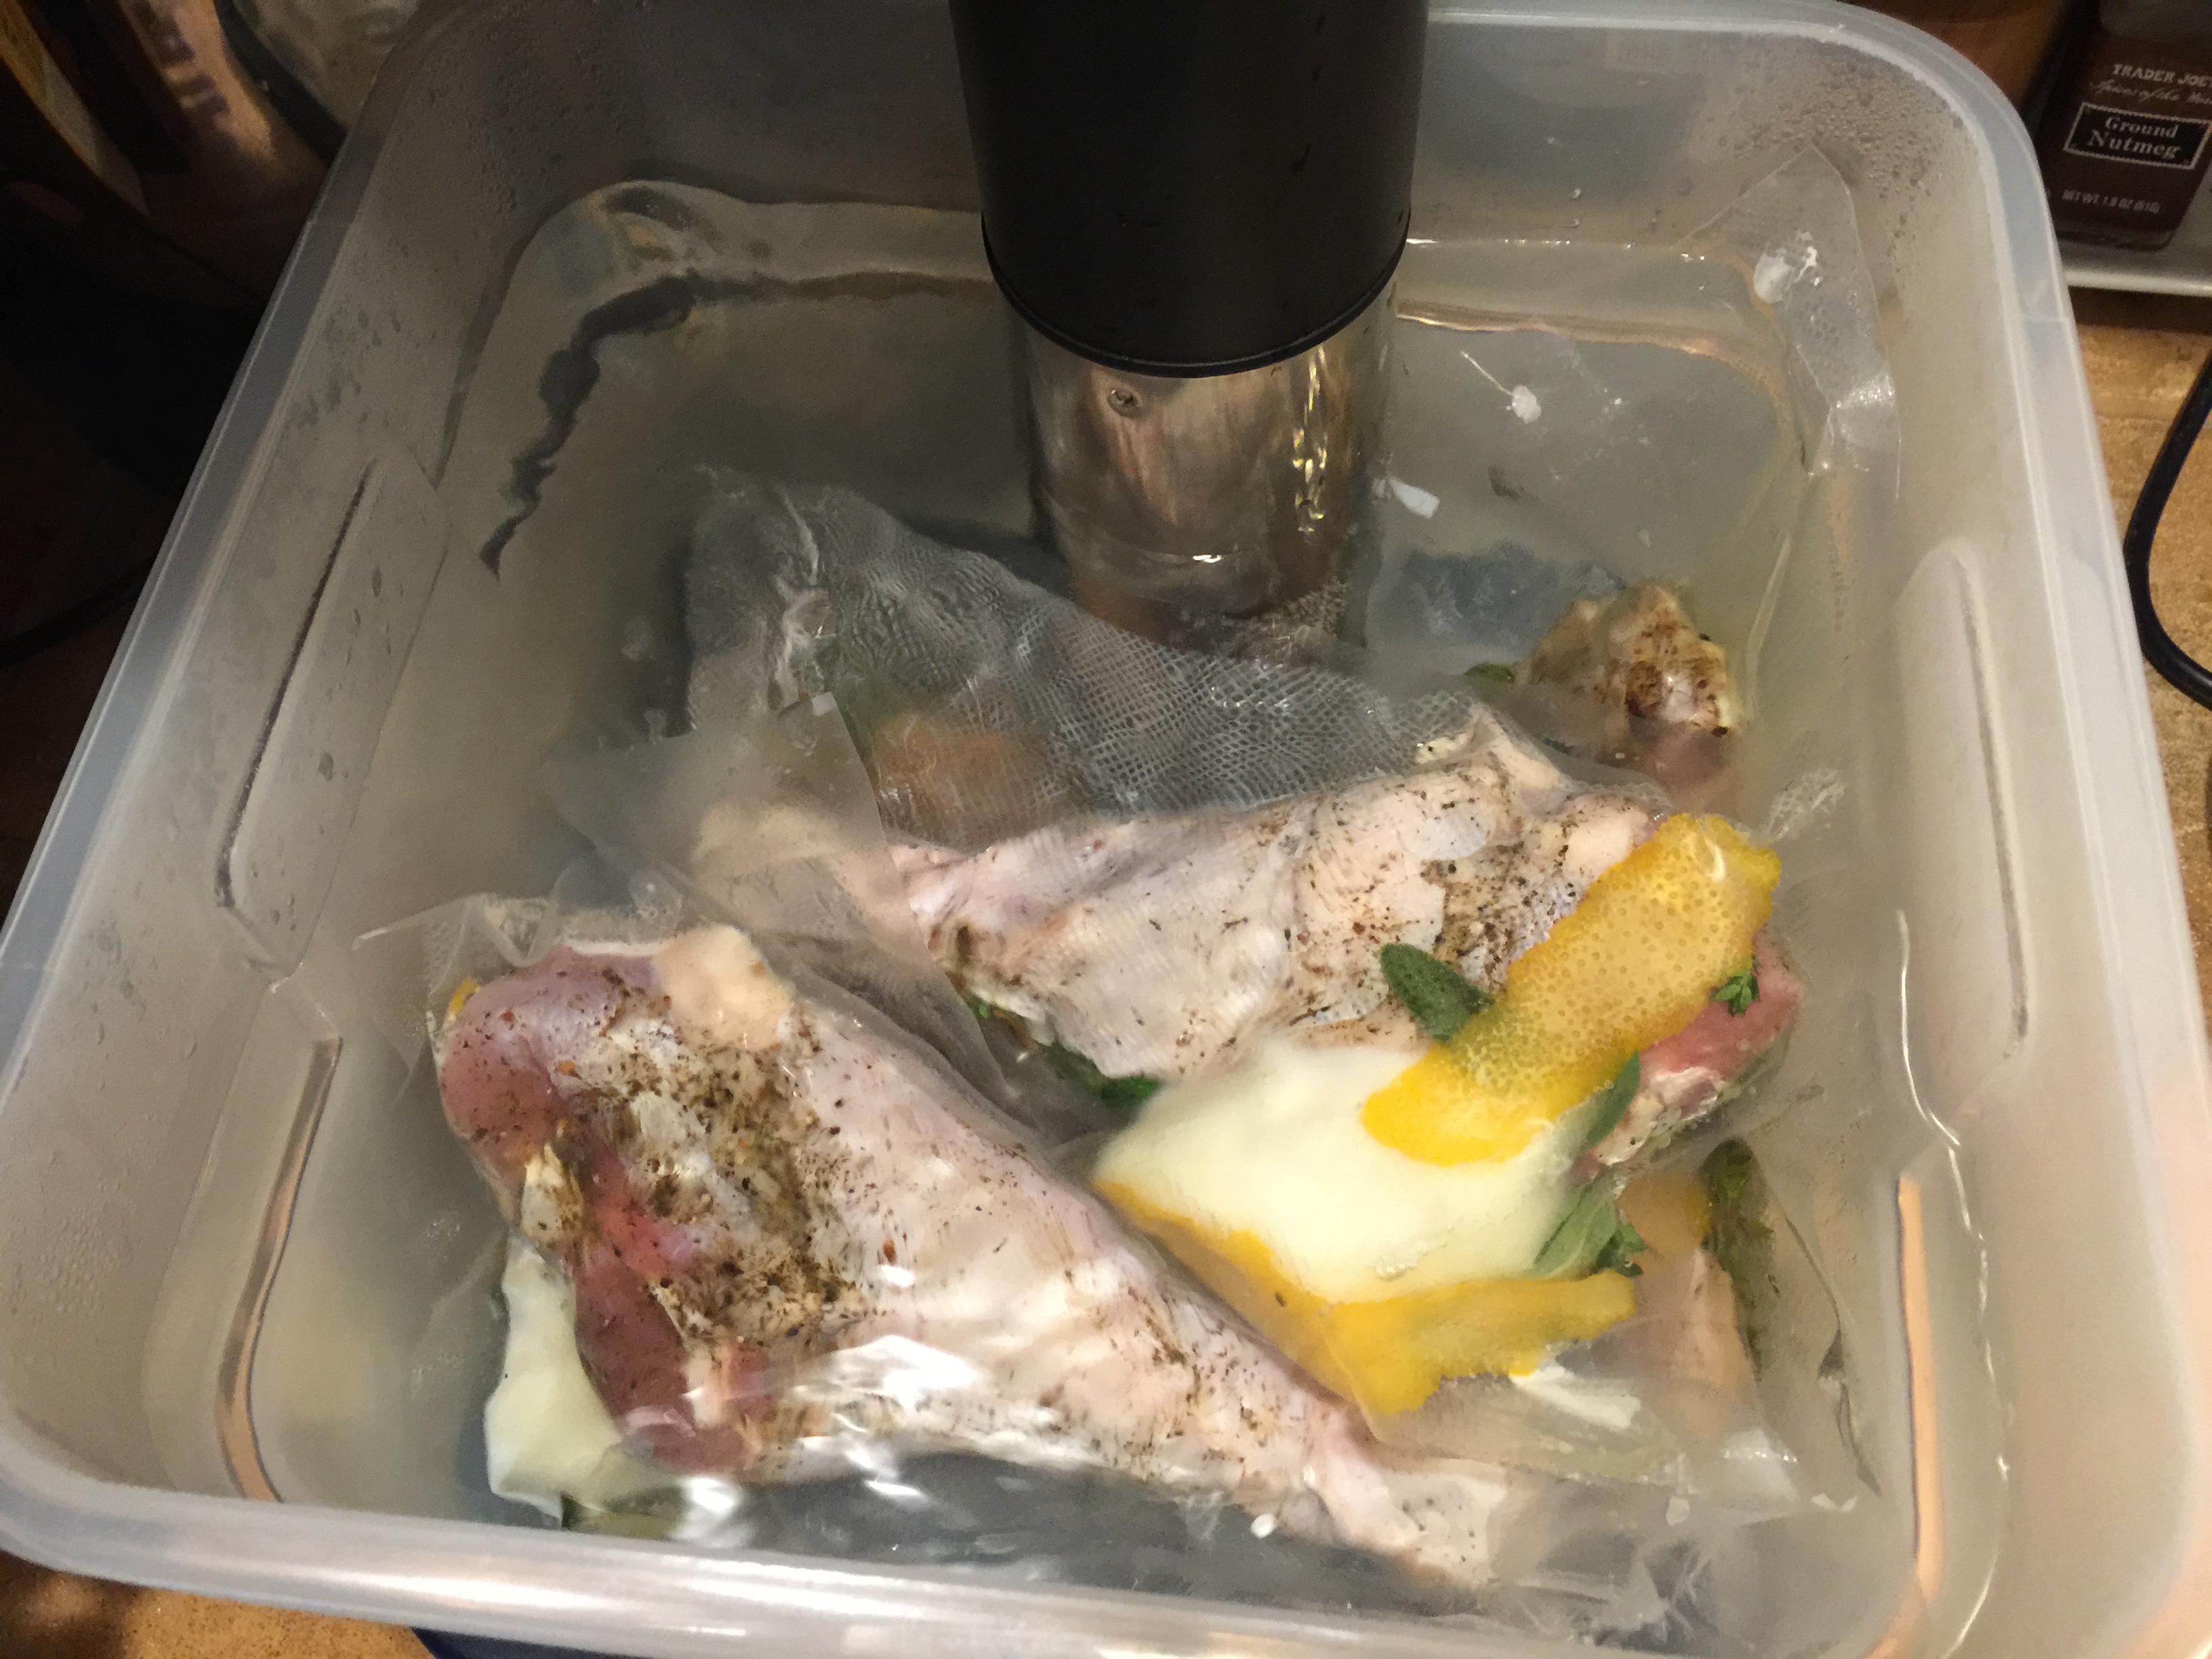
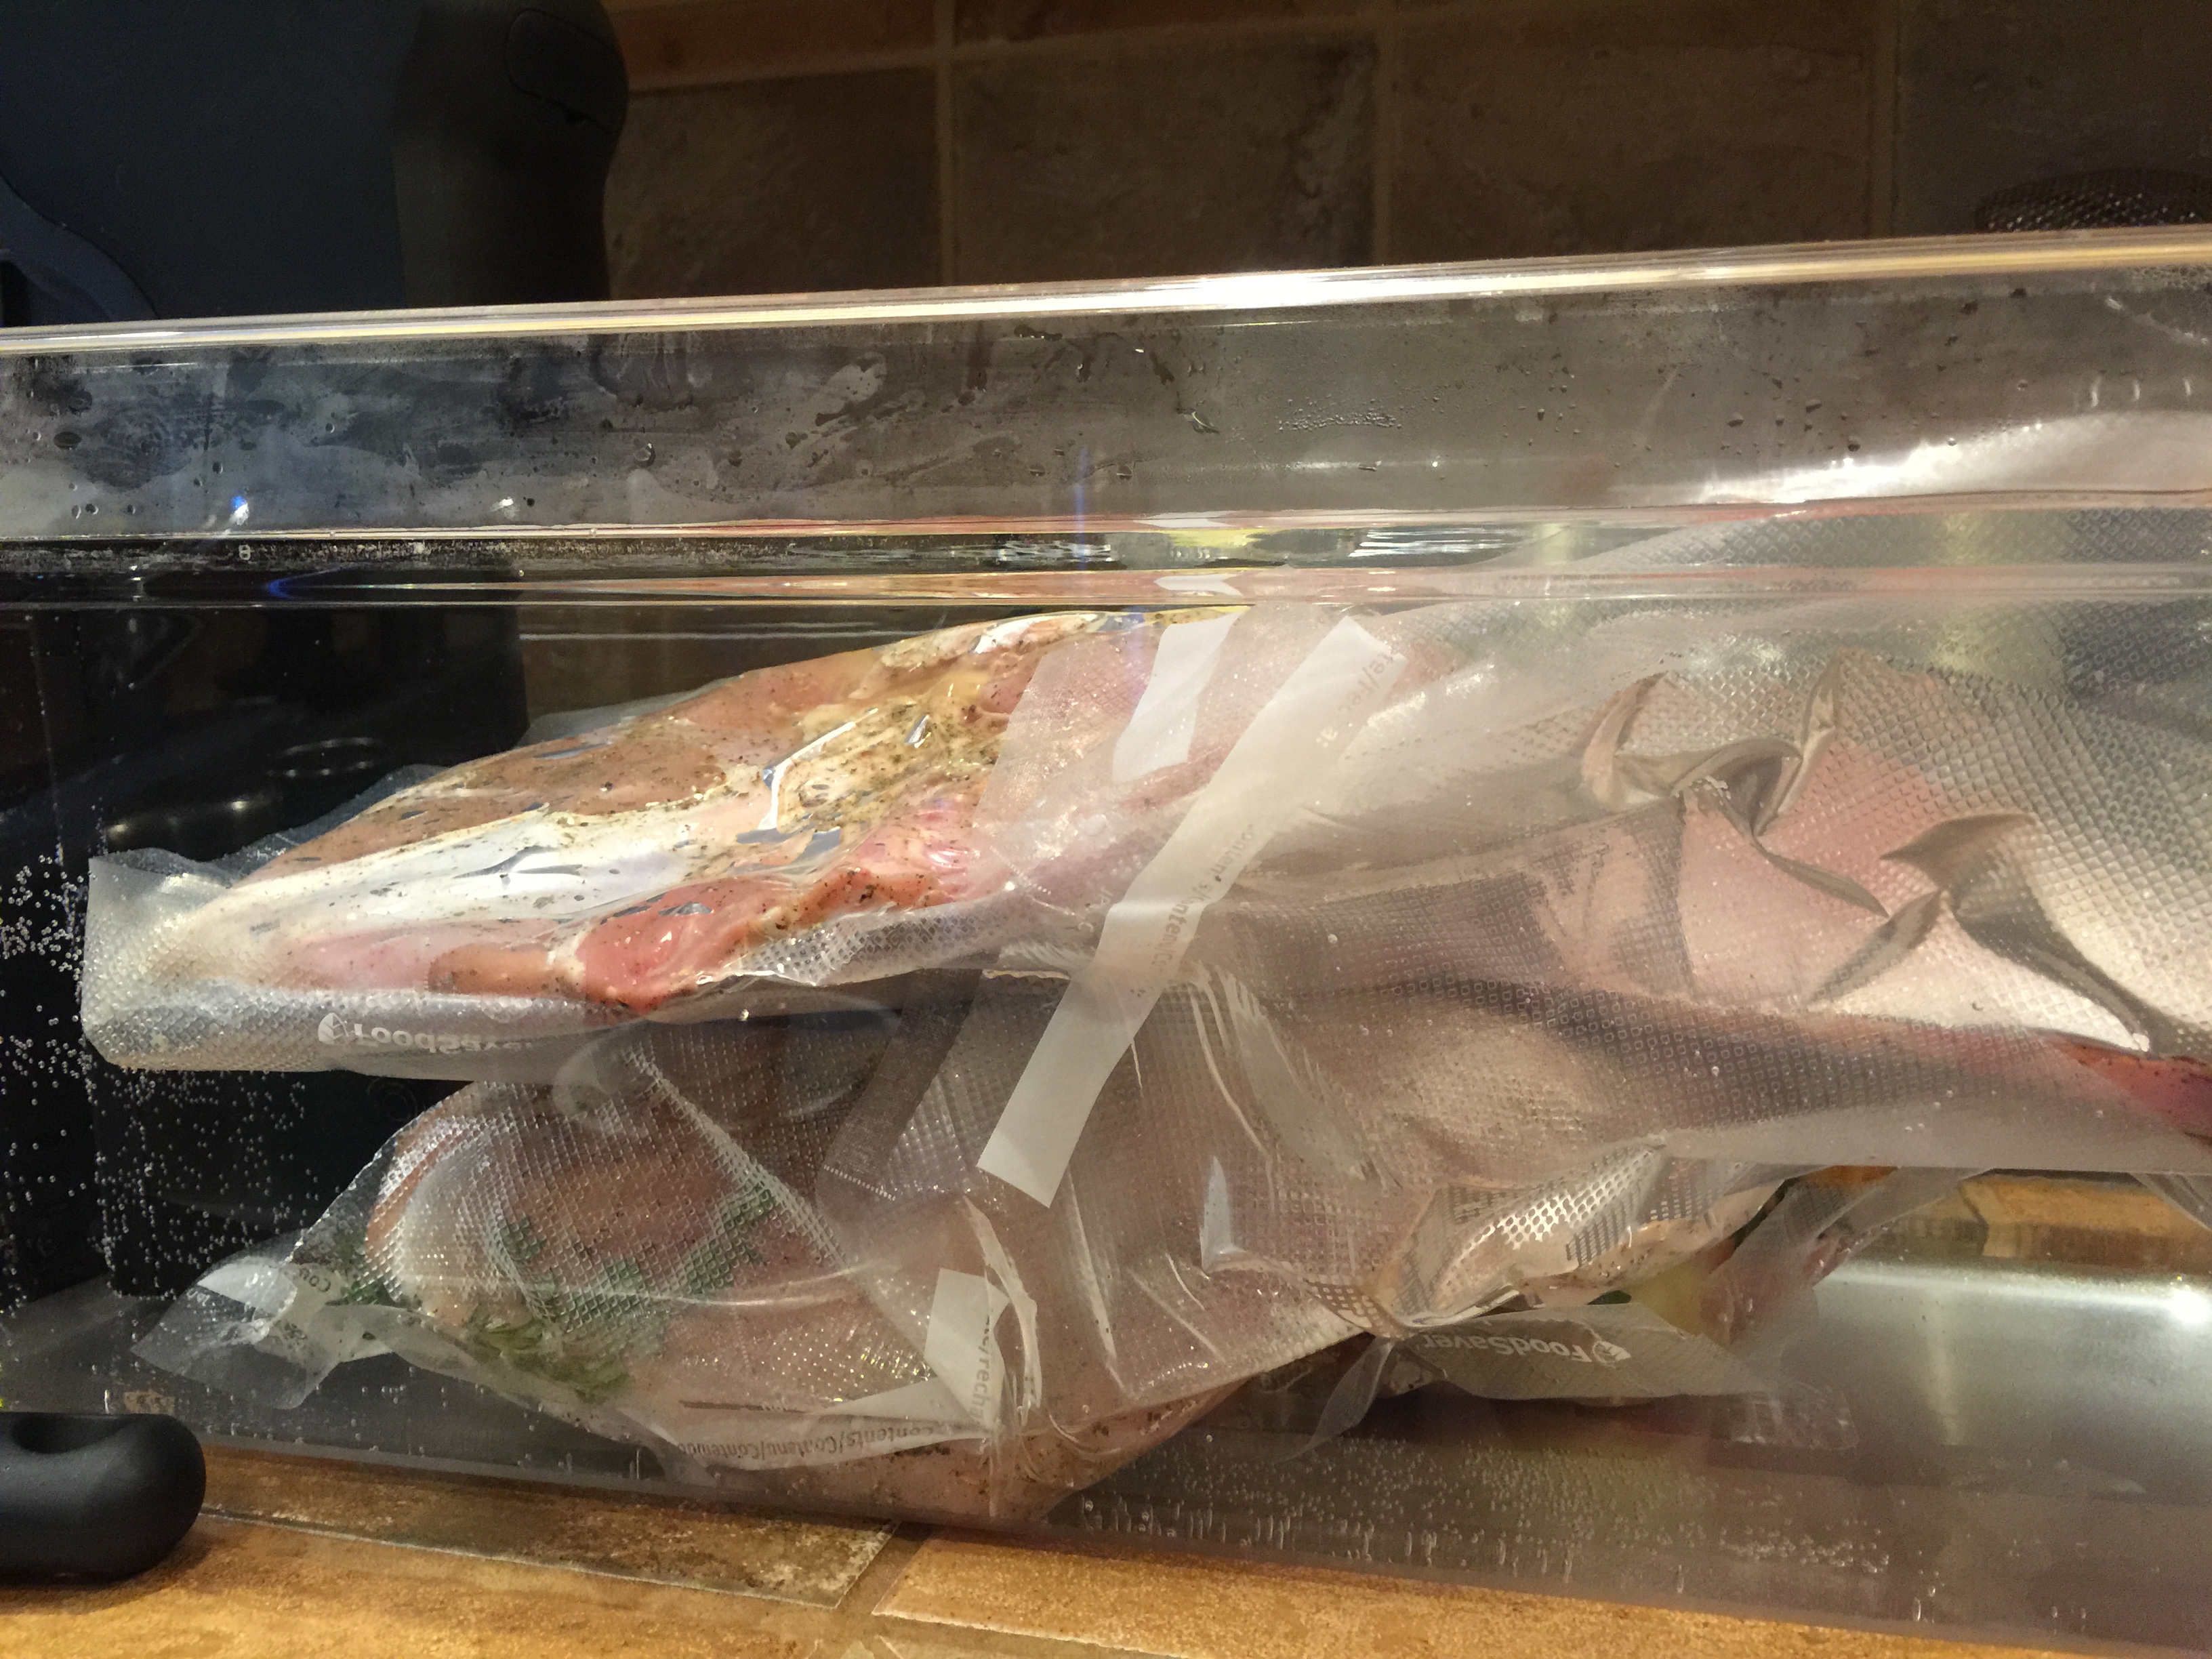
When your water bath has come up to temperature, place the bagged thighs in the water and set a timer for 30 minutes. After 30 minutes, retrieve the breasts and legs from the fridge and place them in the bath. Cook submerged for an additional 2 hours – 2 1/2 hours total for the thighs, 2 hours for the breasts and legs.

  • If you are doing this step the day before serving, remove the bags from the sous vide bath and place in a bowl of iced water to chill for 10-20 minutes, then move the still bagged pieces to the fridge. 2 hours before serving, reheat the water bath to 150F/65.5C and reheat for 60 minutes.

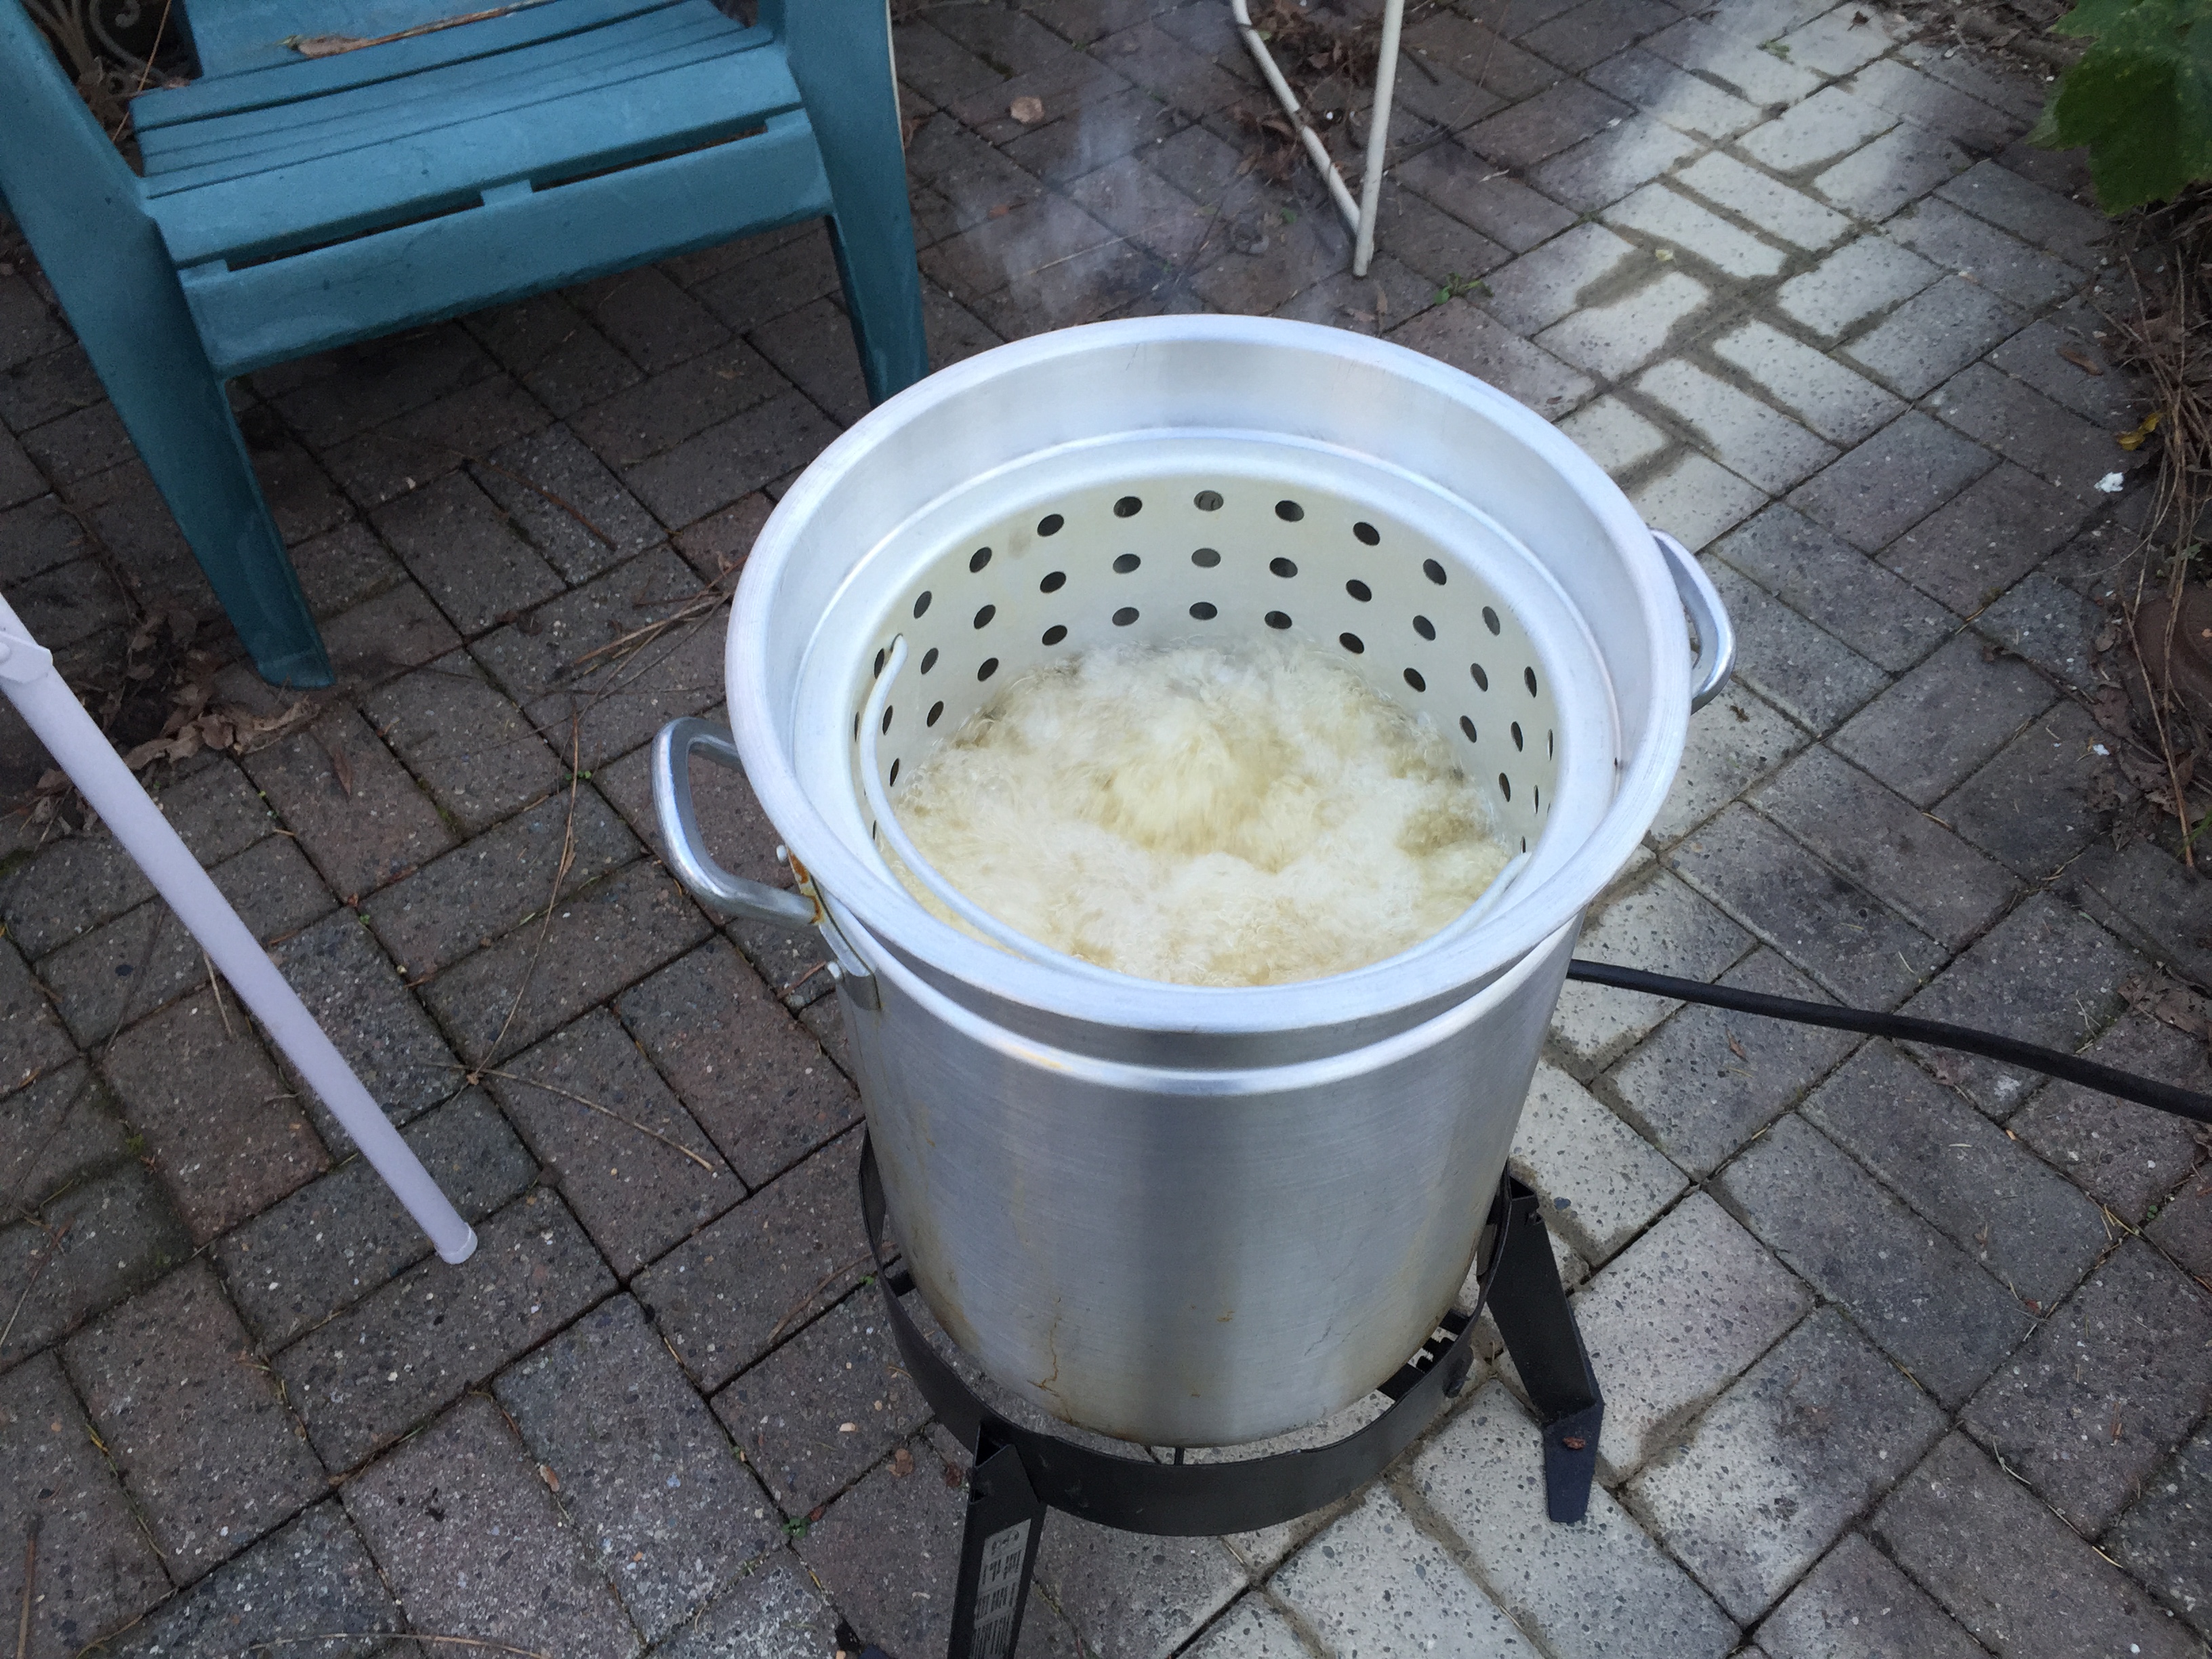
About 70 minutes before serving, preheat the fryer oil in your fryer to 375F. This takes around 30 minutes. WARNING: deep fryers can be dangerous. Never leave one alone while it is heating or cooking. Recruit someone to watch your fryer while you finish prepping the turkey. Please consult your fryers manual for instructions on how to safely use it.

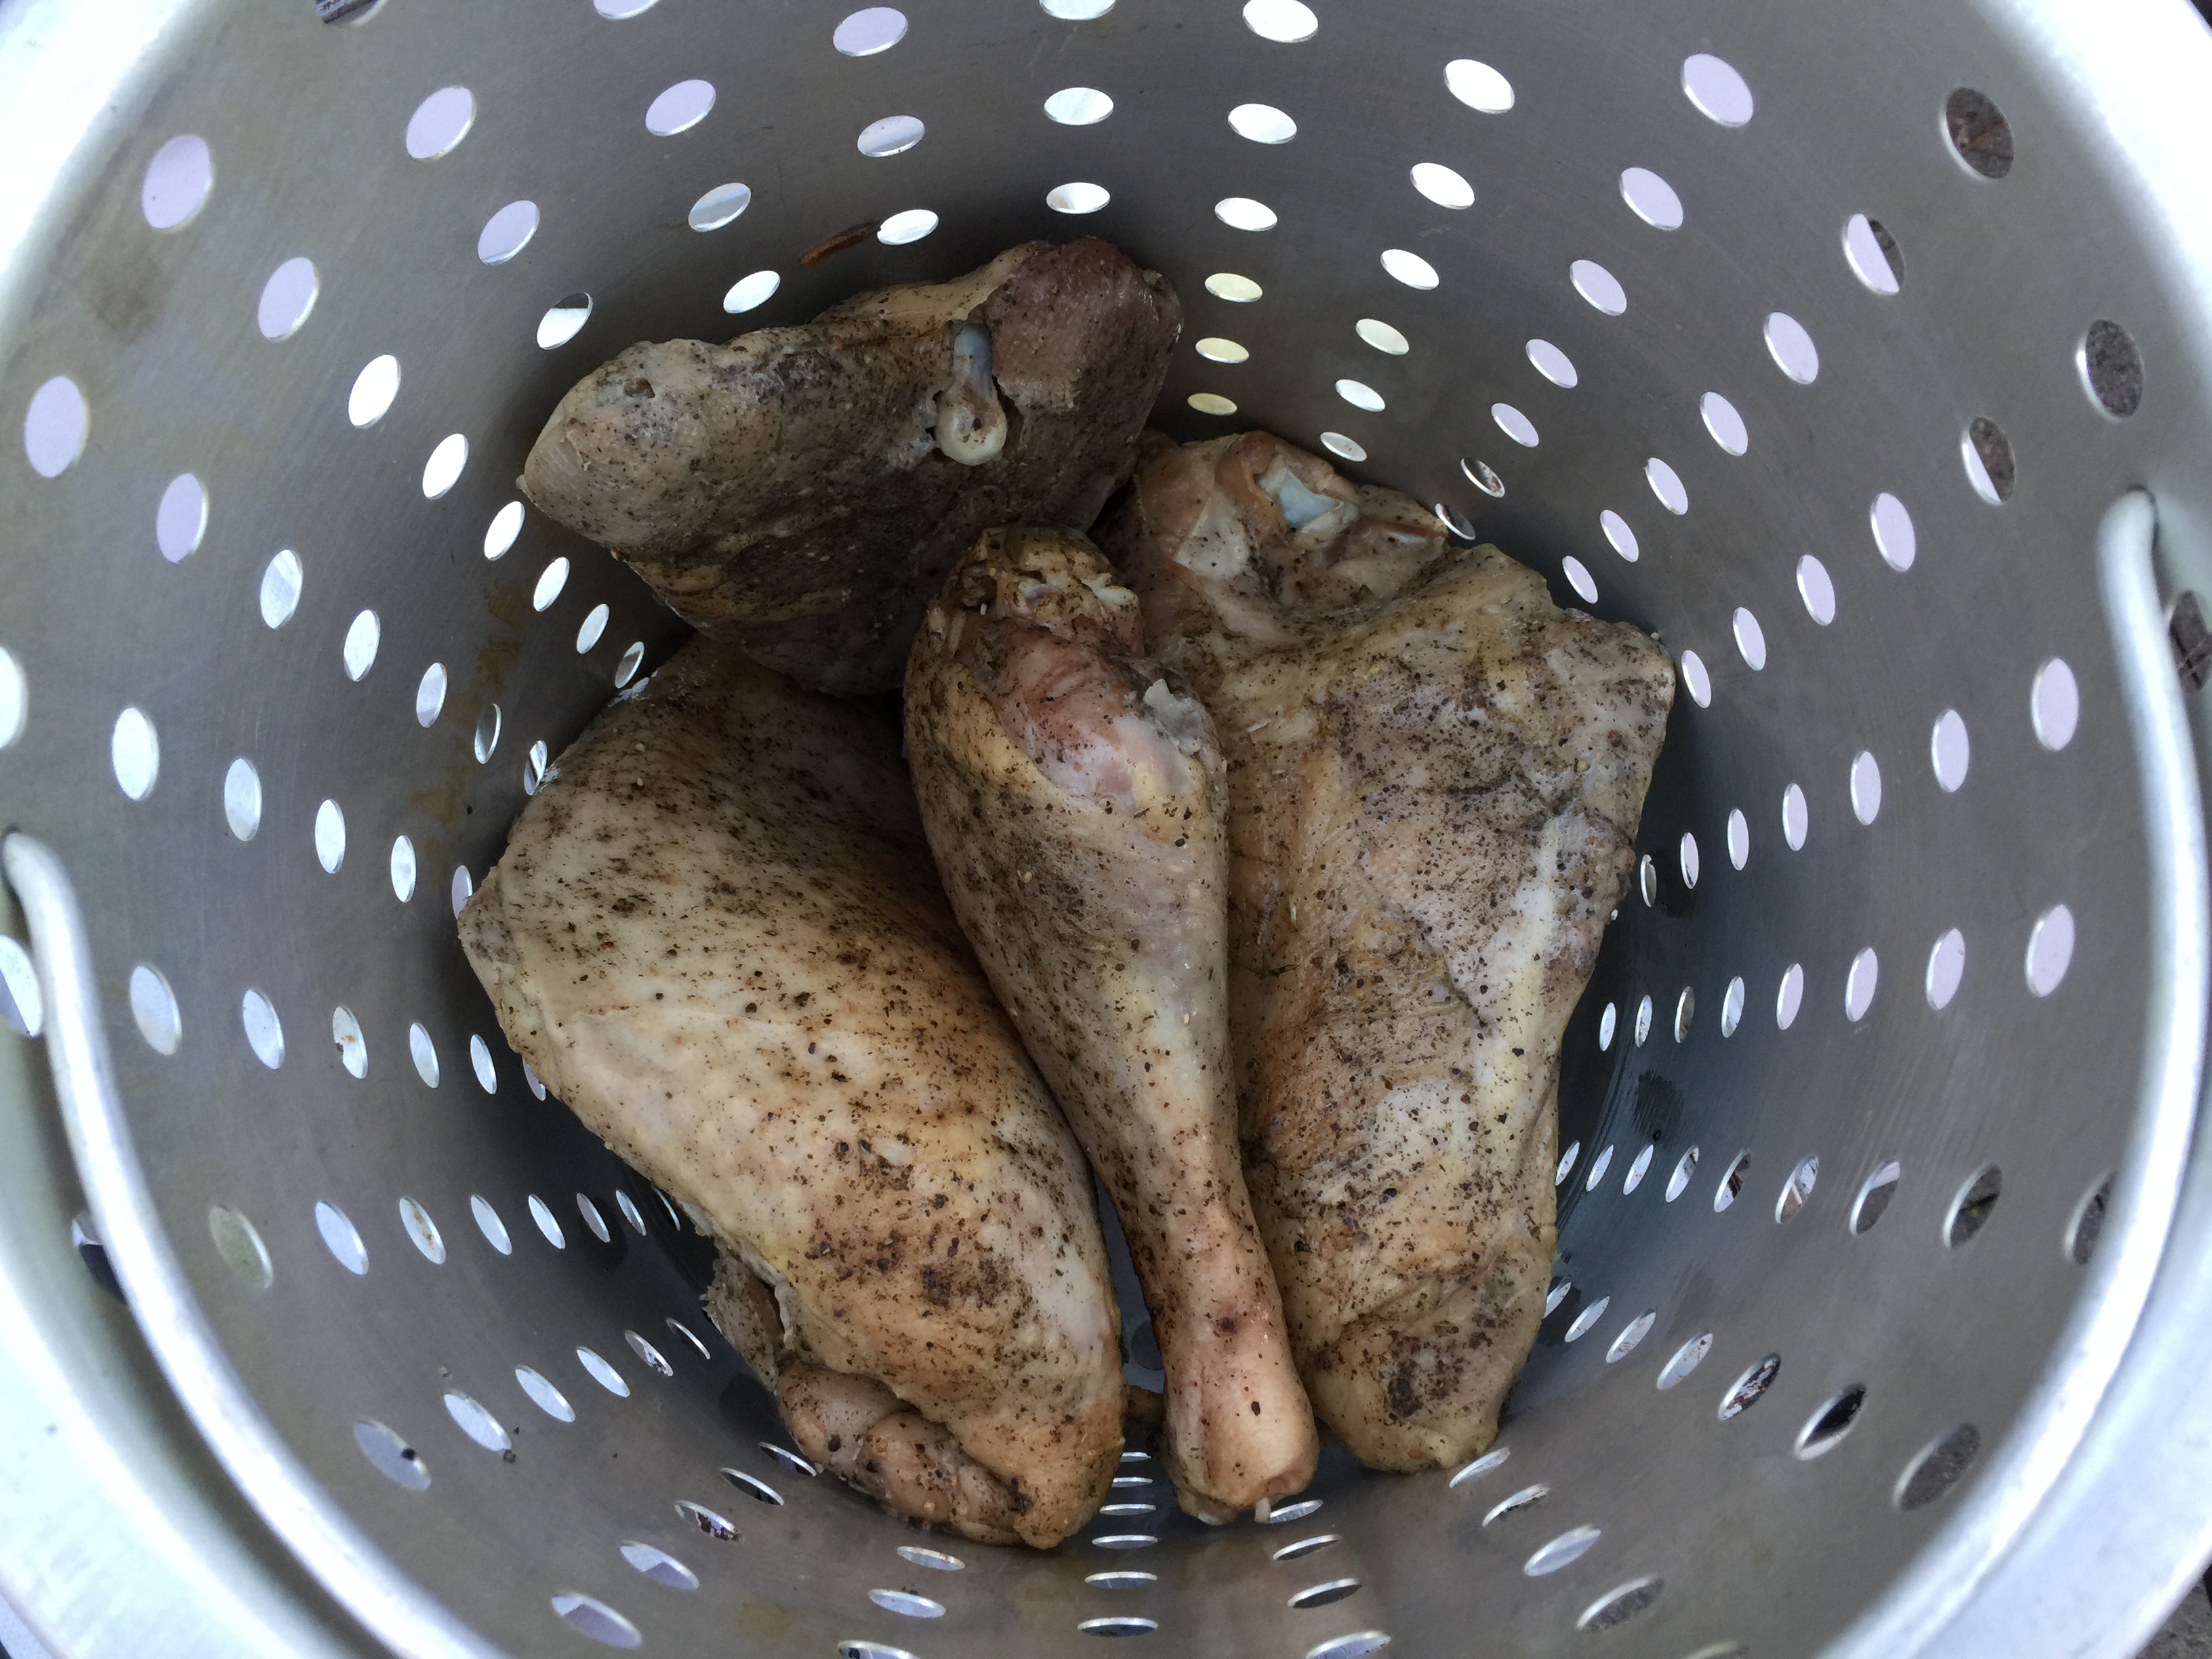
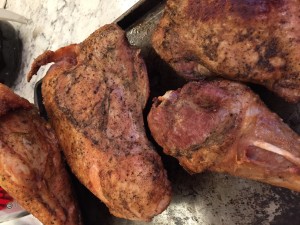
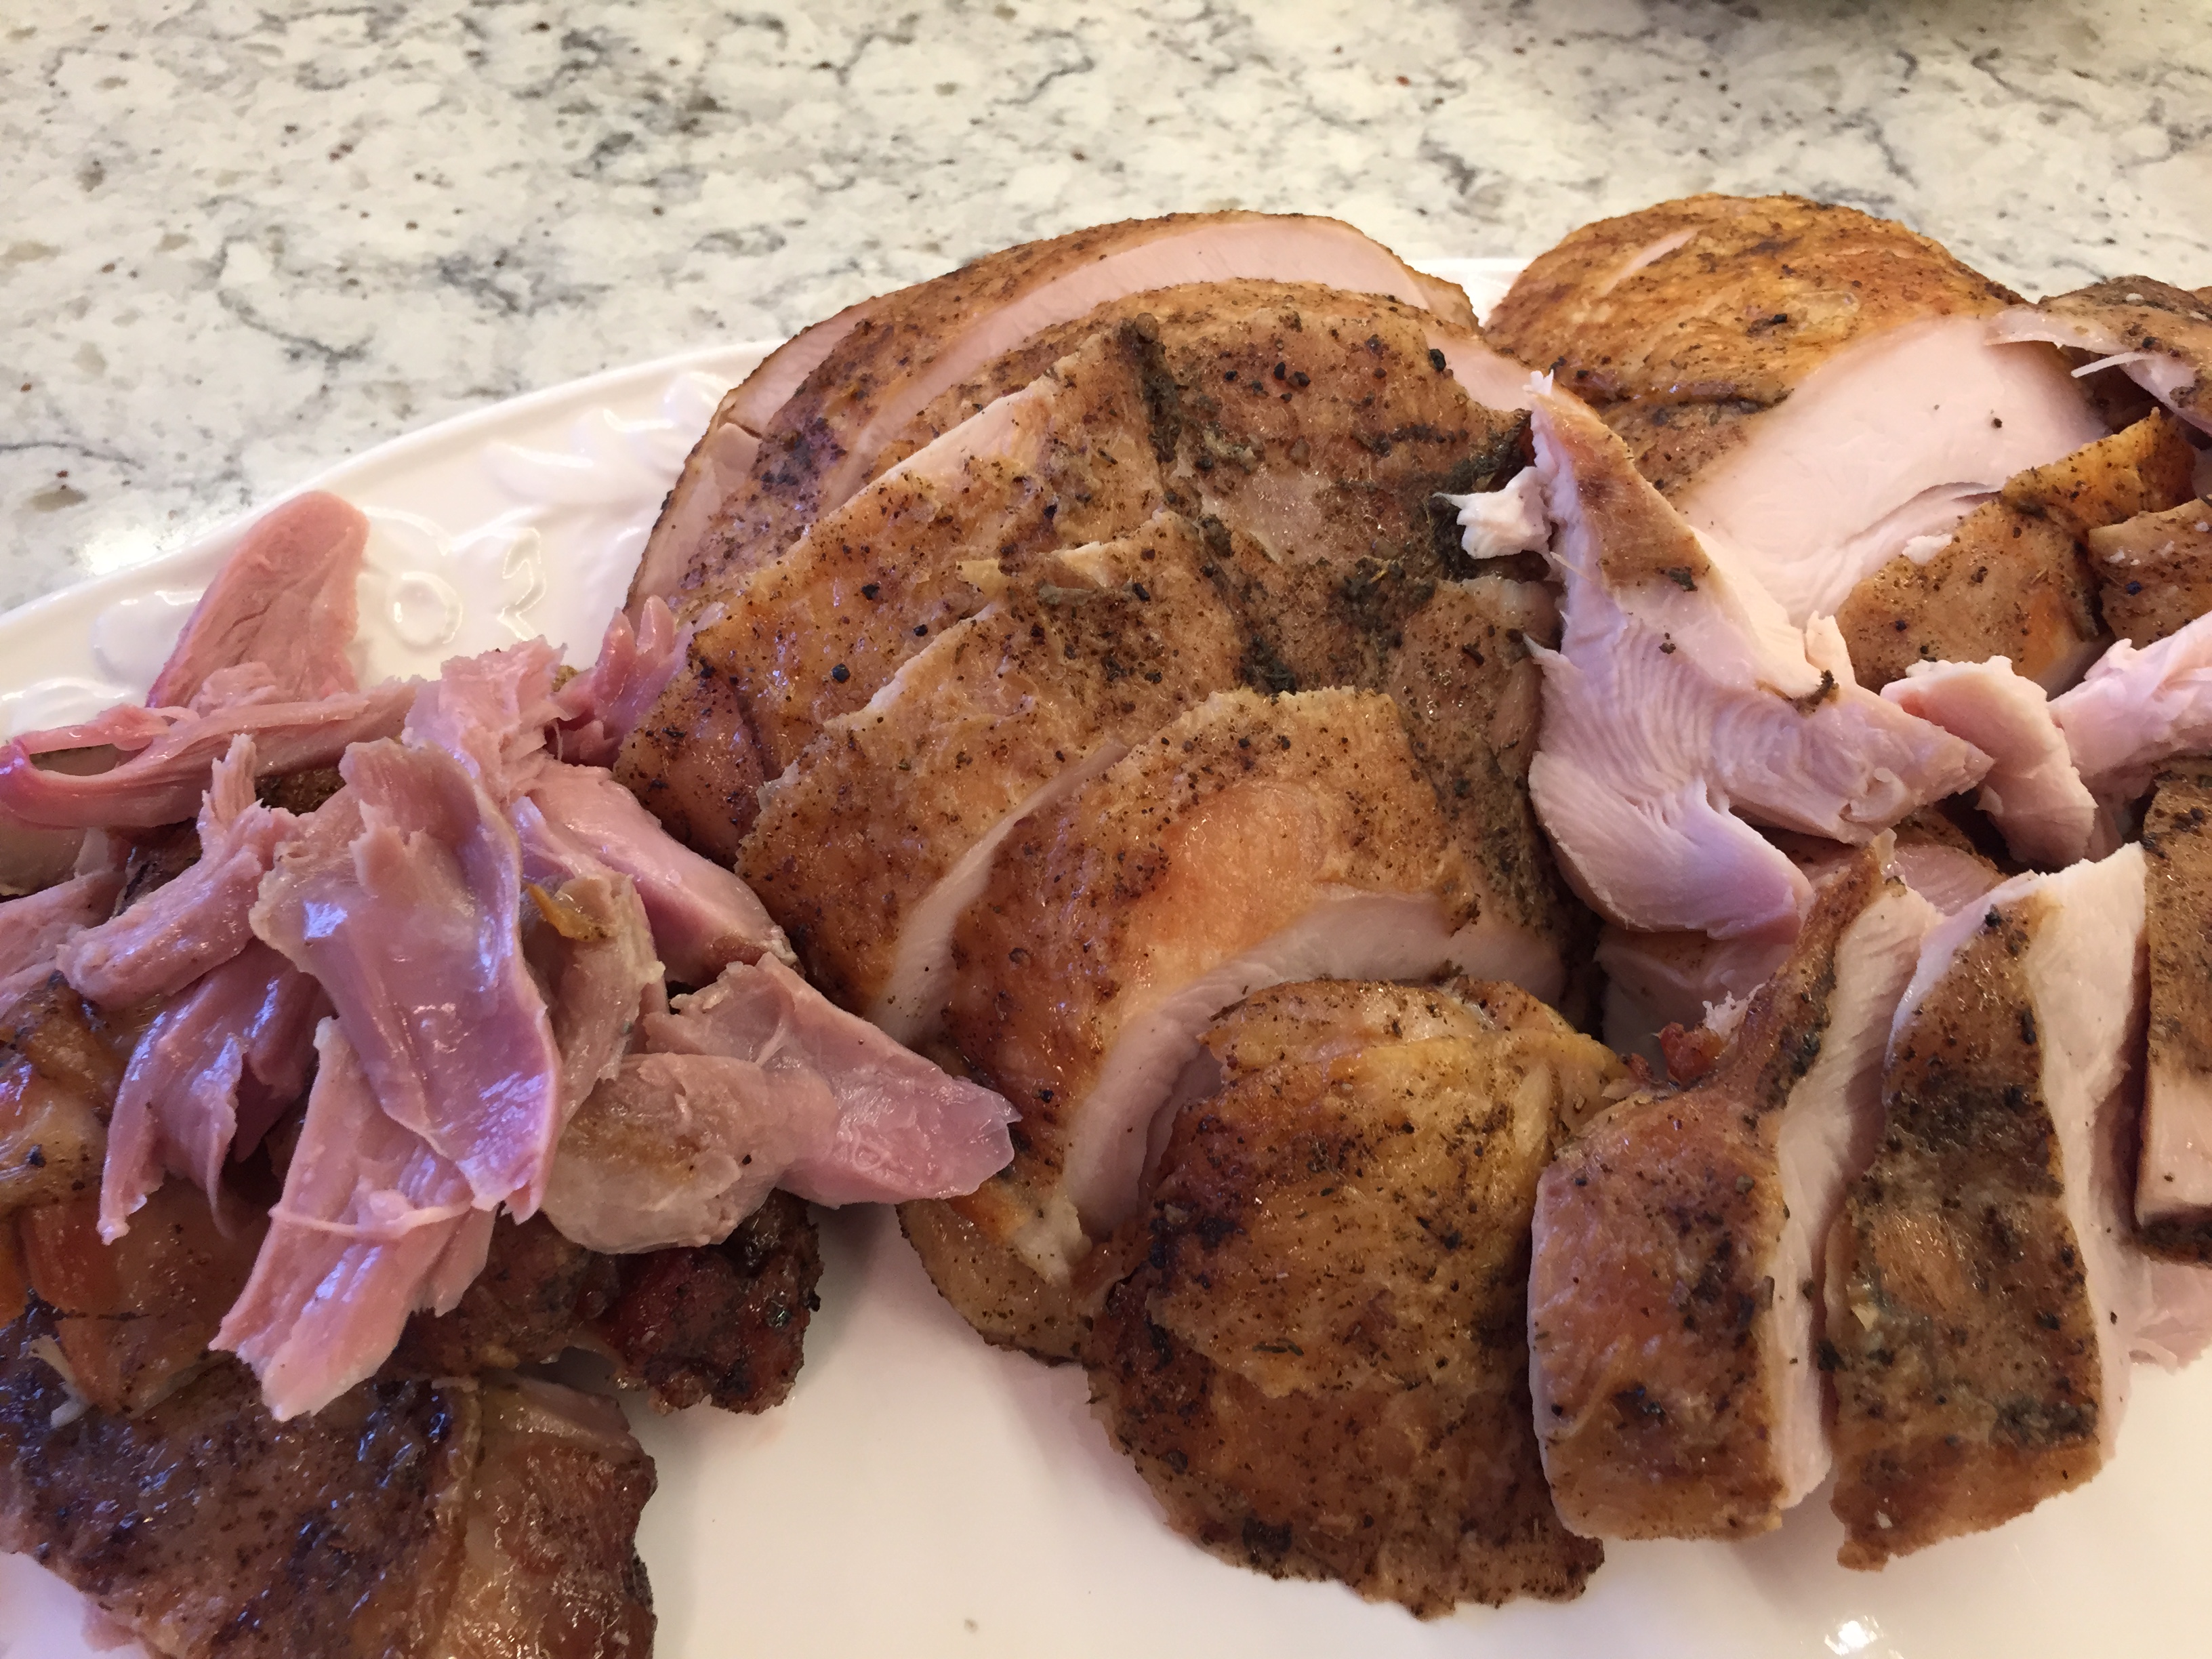
While the fryer is coming to temp, remove the turkey pieces from their bags and place on a paper towel lined sheet pan. Pat dry and remove any aromatics that are stuck to the meat.

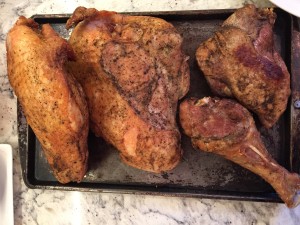
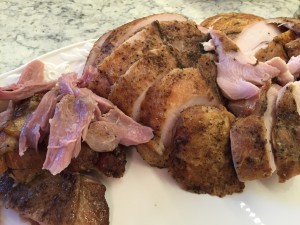
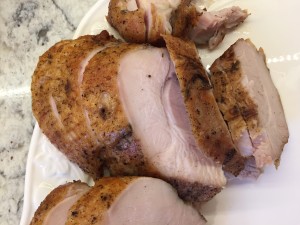
When the fryer is at 375F, working in two batches, fry the turkey pieces for 4-7 minutes until the skin is golden brown and crispy. Evacuate the fried pieces to a clean sheet pan to rest for 20 – 30 minutes. After the first batch, let the oil return to 375F before frying the second batch.

  • I like to use the basket insert for my turkey fryer for this step. I put half of the turkey pieces in the basket, and SLOWLY lower it into the oil using the supplied hook. I start checking for doneness after about 3 minutes. When done, I remove the basket with the hook, let it drain for a few seconds back into the fryer, then move it to another sheet pan setup to catch any drips while I removes the turkey pieces. Reload the basket with the rest of the turkey, and repeat.

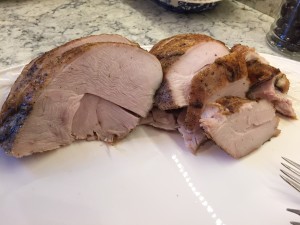
After the turkey has rested, carve as desired and serve.


Sous Vide Cranberry Sauce with Ginger and Orange

Ingredients

  • 1 package (~12oz) fresh cranberries
  • 1 cup sugar
  • 1 medium fresh ginger root
  • Zest of 1 medium orange

Equipment

  • Sous vide setup – immersion circulator and bath or other home made solution
  • Vacuum sealer and bags or large ziploc bags

Setup sous vide rig to cook at 185F/85C.

Peel ginger root using a spoon. Slice half of the ginger root until 1/4 inch rounds, and grate the other half using a microplane or other fine grater.

Place the cranberries, sliced and grated ginger, orange zest, and sugar in a vacuum seal bag and seal.

When the water bath reaches 185F/85C, put the cranberries in the water and place a dinner plate or other water safe weight on top of the bag to keep it submerged. Cook for 1 hour.

  • This can be done a few days in advance. If done in advance, take the cooked cranberries and dunk in an ice bath for 5-10 minutes to chill, then place in the refrigerator until ready to serve.

15 minutes before serving, pour the cranberries and their liquid into a small saucepan over medium heat. Gently stir every few minutes until the sauce has thickened to your desired consistency. Pour into a bowl and serve.


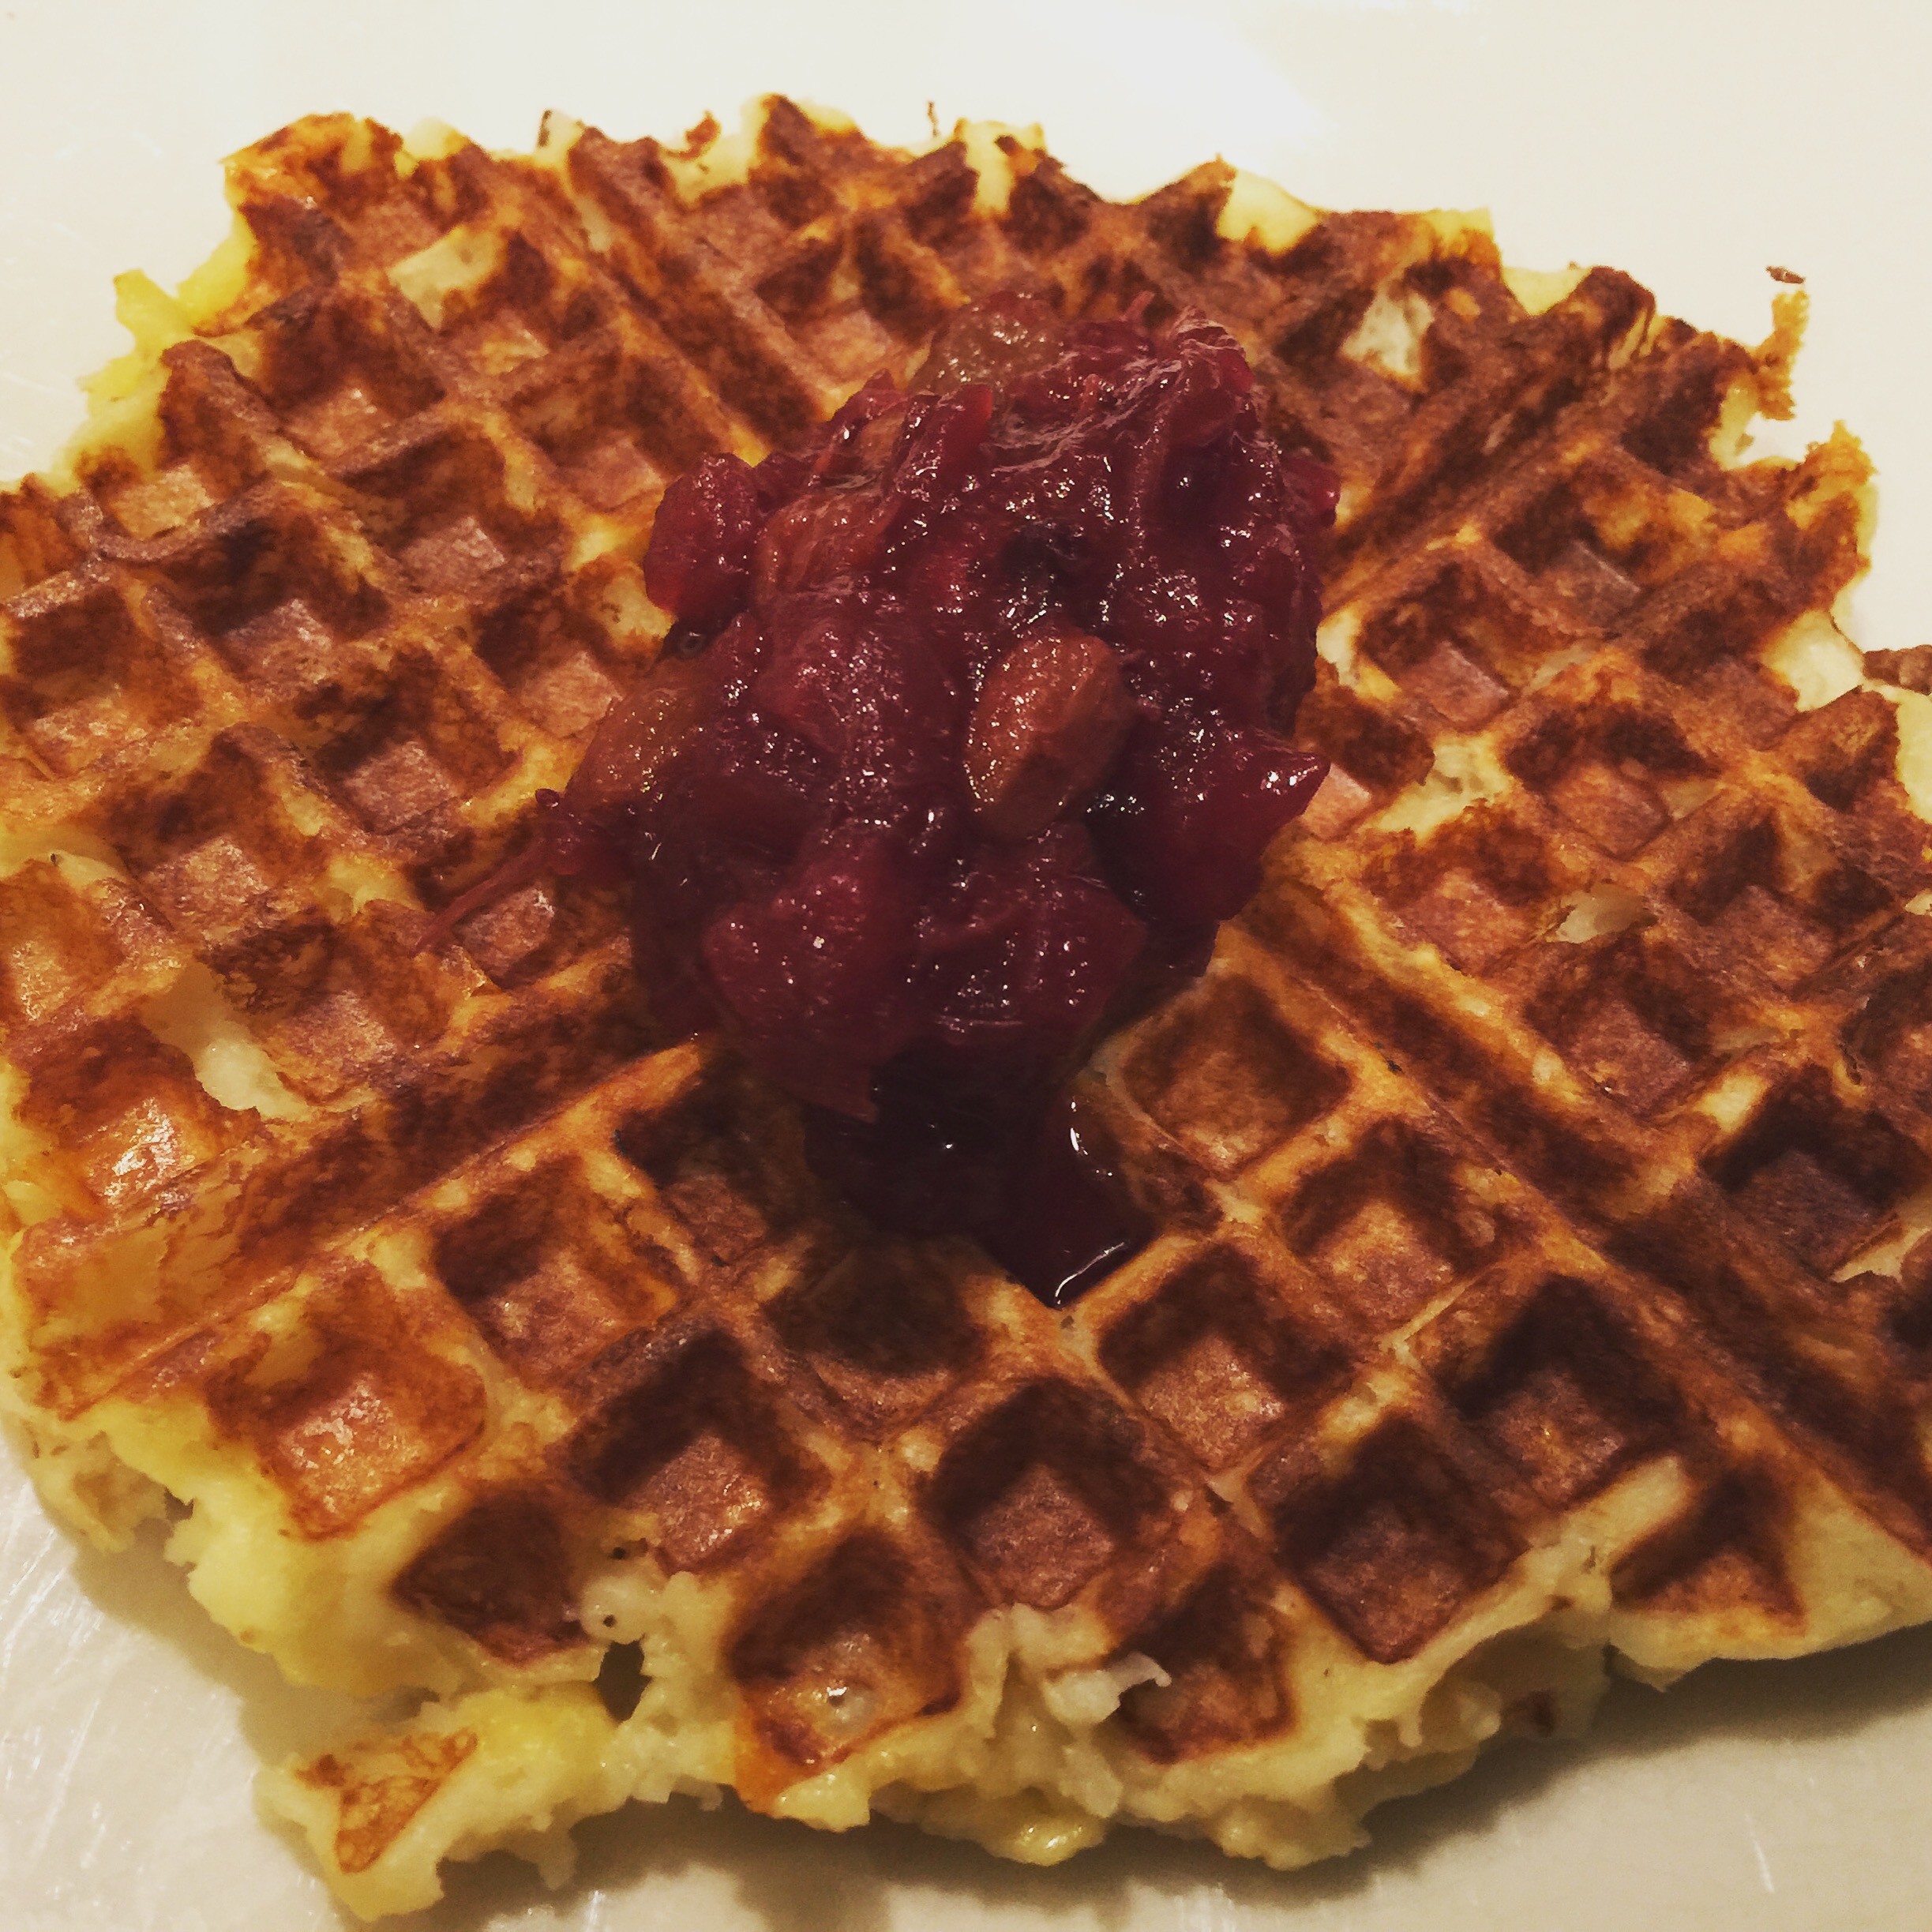
Leftover Mashed Potato Waffles

Ingredients

Mashed Potato Waffle with Cranberry Sauce

Mashed Potato Waffle with Cranberry Sauce

  • 2 cups leftover mashed potatoes
  • 1/2 cup grated cheese (I like sharp cheddar, but anything that melts decently and you have on hand will work)
  • 1/3 cup flour
  • 1 egg
  • Optional:
    • chopped turkey, bacon, crumbled sausage, or any other meat you’d like to experiment with
    • leftover stuffing (replace 1:1 for some of the potatoes)
    • Cranberry Sauce, gravy, syrup (for topping)

Equipment

  • Waffle Iron
  • Non-stick Spray

Mix all ingredients (except toppings) in a medium bowl until well combined and the mixture is the consistency of a thick cupcake or muffin batter.

Set your waffle iron to a medium setting. When it is preheated, give both sides a quick shot of non-stick spray, and place on a scoop of the potato mixture. Close the lid and cook for 4-5 minutes, or until your waffle maker signals it has finished. Waffle should be golden brown and crispy.

Serve with cranberry sauce, gravy, or maple syrup.

Thanksgiving, Part the Second

Before we get back to the turkey, which lets face it is probably why most of you are here, I need to give a big Thank You! to Nick and Jess for spending their first Thanksgiving with my family. (And by “need to”, I mean that they gave me a bunch of harassment for not mentioning them in the last post, so I’m getting it out of the way up top so they can’t miss it and I don’t forget. Love you guys!) Also, I realize that as a “recipe” this whole thing is a bit difficult to follow. I’ll write up an actual recipe and post that as well.

OK, let’s talk turkey, shall we! Last we left the beautiful bird, it was spending 4 days in the fridge in a dry brine.

The Turkey, Phase B (I like mixing my numbering schemes, don’t ask why. I have no clue.)

I started Phase B on Wednesday morning. The way I cook this bird, I do most of the actual cooking the day before Thanksgiving, meaning that day of I have less to worry about. Well, I say “worry about”, but really this is so simple that there isn’t much TO worry about. Regardless, I give the turkey a cook on Wednesday, reheat it and then finish on Thursday.

Step 1: Prep your sous vide setup. Don’t have an immersion circulator? No vessel large enough for an entire turkey? Fear not! There are plenty of guides online for doing sous vide on a budget. All you really need is a thermometer, a cooler, and a ready supply of hot water. Once again, others explain all this much better than I can, so go give it a look if you’re interested. But on to the setup!

I setup one large and one small cambro full of water and set an immersion circulator in each to 150F. While I can get all the turkey in just the large cambro, it just makes me a bit nervous. There’s not much room for water to circulate, it takes a while for the water to get back up to temp with that much mass in there, and I have a second setup so why not use it?

Dry Brined Turkey

Look at the color on that turkey! Beautiful!

Step 2: Time to take the turkey out of the fridge and prep it to cook. After 4 days, it will have taken on a beautiful, dark pink color. The skin should be nice and dry.

Sealed Turkey

Mmmm……duck fat……

Take each individual piece and put it in a vacuum seal bag of appropriate size. I use a Foodsaver that works really well for home applications. If you don’t have a vacuum sealer, just use large ziploc bags! In each bag along with the turkey, put in 1/4 cup of duck fat, a couple pieces of orange peel, several sage leaves, and some fresh thyme. I do the thighs first, because they cook for about 30 minutes longer than the rest of the bird. After turkey and deliciousness are in each bag, vacuum seal (or if using a ziploc bag, push the bag under water up to the zipper, forcing all of the air out of the bag, then seal tight).

Step 3: Time for the cook! Put the thighs in the water bath first, and let them cook for 30 minutes. After 30 minutes, put in the legs and breasts. I put the breasts in the large cambro, and the thighs/legs in the small one. This leaves plenty of space for circulation, and doesn’t cause the temp to drop too severely. Let them go for another 2 hours.

Step 4: After the thighs have been in for 2.5 hours, and the rest in for 2, take all of the sealed bags and put them in ice water to chill. If you don’t have ANOTHER vessel big enough for all that turkey, you can do what I did. I set the temp on each circulator down as low as it will go – they don’t have the ability to cool, but this turns off the heating element entirely – then drained out a significant amount of the water in each cambro. After that, dump in as much ice to each as you have available, and fill the rest with cold water from the tap. This brings the temp down pretty quickly. As the circulators registered rising temperatures, I’d drain out a bit more of the warm water and replace with cool. After about 10 minutes, the meat had cooled down enough to throw it in the fridge.

Step 5: Let the turkey chill out overnight. That’s all there is to this step. Really.

The Turkey, Phase 3

Step 6: It’s THANKSGIVING! Happy Thanksgiving! You have a fully cooked turkey. Fully cooked, but not ready to eat yet. That skin is super rubbery, and the turkey is all cold! A couple hours before serving time, get your sous vide setup going again. The goal here is to get the turkey warmed through, not necessarily all the way back up to 150F. We will, after all, be finishing everything in hot fat, so we don’t want anything to overcook. The turkey should spend 45mins-1hr warming, but if it goes longer it’s not a big deal.

Step 7: 70 minutes or so before serving time, get your turkey fryer all setup. I use one I got at Home Depot a few years ago with peanut oil. You can use whatever fry oil you like. We want the oil to hit 375F. Depending on the day and how powerful the burner on your fryer is, this can take a while. While the oil is heating, you can go and do final prep on your turkey. Just remember to ALWAYS leave someone watching your fryer! This is a giant pot of oil over open flame after all! This is dangerous!

While the oil is heating, take each piece of turkey from the water bath, cut open the bag, and put the pieces on a paper towel lined sheet pan. I also try to remove any herbs or orange peel stuck to the turkey, we don’t need that hitting the deep fryer as well. Pat everything dry.

Fryer Basket

Got the fryer basket loaded up with half of the turkey

Step 8: It’s about 40 minutes before you want to eat, your oil should be about at 375F by now, and we are ready to fry! Your fryer probably came with a nice fryer basket to use in just this type of situation (see pic above for reference). Load it up with about half the turkey – I did 2 breasts, 1 thigh, and 1 leg per batch. Take the thermometer out of the oil to make room for the basket, and SLOWLY….VERY SLOWLY!!!! lower the basket into the hot oil using the provided hook and the handle on the basket. Since we’ve dried off the turkey already, there shouldn’t be any splattering, but there will be plenty of bubbling. If you lower things in too fast, you might get a boil over, in which case your Thanksgiving turns into this. You don’t want that. Nobody wants that!

Turkey Fryer

The fryer bubbling away

You want to let the turkey cook for about 5 minutes per batch. All we are looking for here is a nice, crispy skin. We don’t need to worry about cooking the turkey at all, that’s already taken care of! After about 3.5 minutes I start lifting the basket out a few inches to take a look at the skin. It probably won’t be done yet, that’s ok. Just lower it back in (CAREFULLY!!!!) and let it keep going another minute or so, then check again. Again, since we aren’t looking for a specific internal temp, about 5 minutes is the best I can give you. It’s a guideline. I think one batch took about 4, another about 5.5. It’s just going to depend.

Step 9: Once the desired skin crispiness is achieved, CAREFULLY remove the basket, let it drain above the pot for a minute, then move to a clean, oil safe surface so you can get your turkey out of there. I use a pair of tongs and some other device (large fork, spatula, another pair of tongs, whatever is convenient) to take each piece out one at a time and drop them on another sheet pan. Then load up the basket with the rest of the turkey, wait for the oil to get back to 375F, and do it again!

Step 10: Let the finished meat rest. This is a rule of cooking any meat. We’ve worked hard at keeping this turkey moist and juicy, and we don’t want to ruin that by carving right away. We started the frying about 40 minutes early, it took 10 minutes or so. We’ve got 30 minutes until people will start rioting. Give this 15 minutes or so before starting in on it, OK?

Step 11: Time to carve! Now I’ll admit, I’m not the best at this part. I only practice it once a year after all. But generally, I like to cut thick slices of the breast meat instead of those thin ones people traditionally do. For the thighs, take out the bone first, then slice nice wide pieces. The legs are up to you – leave them whole if people in your group like that, or just slice off the meat from the bone. I go back and forth on that one personally. I only carved 2 of the 4 breasts, and all of the dark meat. We at almost all of that with 17 of us. The rest of the breast meat we cut up for leftovers. Such good leftovers!

Step 12: Eat it! This is the best turkey you’ve ever had, so enjoy! The meat is moist and flavorful, the skin is crispy, slightly salty, with lots of flavor from the duck fat and herbs. I’m making my mouth water just thinking about it.

And that’s it, the best turkey you’ll ever have. Or at least the best I’ve ever had. It may have taken 5 days and 3 different cooks, but it was worth it! In the next couple of days I’ll put up another post with this whole thing as a real recipe. And as a bonus, I’ll throw in my super simple sous vide cranberries, which are also killer! If you have any questions let me know in the comments. The comments are moderated (had some spam issues early on), but I’ll approve any real questions and answer as best I can!

With that, I hope you all had amazing Thanksgiving’s of your own, and that next year you’ll consider giving my turkey a try. Or hey, Christmas is coming up! I know some people do turkey for that as well 🙂

Thanksgiving, Part 1

Thanksgiving may be the thing that really, truly got me into cooking. I’ve tried to nail down when I fell in love with the act of making food, and the one defining moment I come back to over and over is Thanksgiving. It was my senior year of college, and a family friend had been diagnosed with cancer.  We didn’t know if she’d make it to another Thanksgiving, so I decided we should blow it out that year, really go for it. I planned something like a 7 course plated dinner with my mom, for about 18 people. It was an absurd idea, but somehow we pulled it off. I only remember a few of the things we actually cooked that year – Alton Brown’s salt roasted shrimp and his deep fried turkey were both featured – but I do remember it as being thing that made me decide I loved cooking for other people.

This wasn’t the first time I’d cooked. The first time I really remember cooking, other than a grilled cheese sandwich or Top Ramen, was in high school when my parents would be out for the evening. Left to my own devices, I’d pull out some raw chicken, chop it into strips, and then sauté it with whatever spices I pulled from the cabinets that smelled good at the time. I always convinced myself they tasted good. Now I’d say they were more tolerable than actually good. But I digress. I’m good at digressing.

The Thanksgiving turkey has become the one food that I MUST cook every year. Without fail. It is some sort of primal need. My wife and I jump back and forth between her parents and mine each year, and I cook the turkey no matter where we are. If there is a way to roast, fry, barbecue, or sous vide a turkey, I’ve probably tried it. There are years where two different preparations happen just because I can’t make up my mind (or my mom requests a “normal roasted turkey” because she doesn’t really like the barbecued ones, too smokey for her tastes.) But three years ago, that all changed. I hit the jackpot. I found the last turkey I’ll ever need. It was, quite simply, perfect. Or at least very nearly. There is still a place for a beautifully smoked bird in this world, just not at my Thanksgiving table.

OK, so let’s get to the good part, shall we? Over the next few posts, I’ll go into detail of how I make my turkey – and maybe a few other things. Cranberries I think are also on my to-do list this year. If you’re looking for a good gravy recipe, or stuffing, well you’re at the wrong place. My mom makes the worlds best stuffing (well, dressing, since I don’t stuff my birds), so I don’t even bother. And my grandma’s gravy, by way of my dad, is sublime. I’ve never even tried to make gravy because why would I, her’s is incredible!

The Turkey, Phase 1

Remember when I said my turkey was ALMOST perfect? Well, I say almost because I’m trying something very slightly different this year. Usually, I brine my bird. There’s a lot of back and forth on that particular subject, and I feel like I’ve had good luck with it in the past. But my second favorite turkey ever was one that I dry brined. So I’m giving that a go this year as a small adjustment to the recipe I’ve done the past two years.

The Bird (and a half)

The Bird (and a half)

Step 1: Go out and get yourself a turkey! This year I got a 14.2 pound whole, fresh turkey, and a 7 pound turkey breast. Why the extra breast meat? A lot of the people I have Thanksgiving with prefer white meat (they CRAZY, but hey, who am I to judge.) Also, I wanted around 20 pounds before I started hacking everything apart. Plus I find birds bigger than around 15 pounds or so get very difficult to disassemble, which you will see shortly is important.

The Dry Brine

The Dry Brine

Step 2: Make your dry brine. For this, I use Alton Brown’s recipe from his Butterflied, Dry Brined Roasted Turkey recipe. His recipe is for a 14 pound turkey, so I did 1.5x everything.

  • 5.25 Tbsp kosher salt
  • 2.75 tsp rubbed sage
  • 2.75 tsp dried thyme
  • 1.875 tsp whole black peppercorns
  • 0.75 tsp whole allspice berries

Take it all, and put it in a spice grinder. Grind into a coarse powder. Or be like me and get overzealous and grind it into an ultra fine powder. It’ll still do its job just fine!

Step 3: Disassemble your bird. This is the hardest part, and for a lot of people probably intimidating. Having done it a few times now, I can say it isn’t so bad! But it does take some practice to get good at. I’m far from an expert, so if you’re looking for a guide or step by step, I’d recommend checking out this video of chef Michael Voltaggio cutting up a turkey. Bonus, he’s where I got the base of this recipe from! So you get a sneak peek at what’s still to come.

Disassembled and ready to rest

Disassembled and ready to rest

Step 4: Now that your turkey is in pieces, line a sheet pan (or two) with parchment paper, spread out the pieces, and dust them on all sides with your dry brine. These now go into the fridge, uncovered, for the next 4 days. Yes, you really do want to do this days in advance. This gives the brine time to do its work, and beautiful work it is!

That’s all for the next few days until Wednesday, when we do the first cook. Yes, the first cook. I told you I take my turkey seriously!

© 2024 jessegamble.com

Theme by Anders NorenUp ↑