Food, Games, Photos, and stuff that isn't any of those things

Category: Uncategorized

Cinerama Style Chocolate Popcorn

If you miss the Cinerama’s chocolate popcorn as much as I do, this is for you. I personally prefer about a 50/50 mix of “buttered” and chocolate. (“Buttered” because there is no butter in a movie theater style popcorn, they use Flavacol butter flavored salt.) Kendall is more a 66/33 chocolate to “buttered” person.

I’ll provide Amazon links for the harder to find items, but if you can find them other places please go for it.

As for sizing this recipe, you’ll need to experiment a bit. What will fit in your pot? How much do you want to make? I personally can handle a pretty big sized mixing bowl to myself, but that’s not necessarily a “healthy” or “responsible” choice. This recipe will be for 8oz total unpopped popcorn, enough to completely fill a 5qt mixing bowl when popped.

For my preferred mix, you need to make two batches. If you want all chocolate, you can skip the “buttered” instructions and you only need to do it in one.

Ingredients

Mushroom style popcorn (Amazon link)
Gold Medal Chocolate Glaze Pop (Amazon link)
Coconut Oil (preferably refined)

If you want to make a chocolate/”buttered” mix:
Butterfly style popcorn (the normal kernels you probably already have)
Flavacol Seasoning popcorn salt (Amazon link)

Method

Place a large pot (make sure you have a lid that fits) over medium-high heat. Add a few tablespoons of coconut oil in the pot and let it fully melt – you just need enough to fully cover the bottom of the pot.

— For “buttered” popcorn —

Add 4oz “butterfly” style popcorn kernels to the pot, and sprinkle in 1/2tsp Flavacol seasoning salt. (For different amounts of popcorn, check the Flavacol package for recommended amount.)

Place the lid on the pot, and gently shake the pot back and forth over the heat. After a minute or two, the kernels will begin to pop. Keep shaking the pot steadily until the popcorn popping slows. Once there are a few seconds between pops, remove from the heat, take off the lid, and dump the popcorn into a large bowl.

–For Chocolate popcorn —

Put the pot back on the heat, and add another tablespoon or two of coconut oil to the pot and let it fully melt. When melted it should fully cover the bottom of your pot.

Add 4oz of Mushroom style popcorn kernels to the pot, then sprinkle in 2oz of Chocolate Glaze Pop powder. (The ratio for this is always 2:1, regardless of the amount of popcorn you use. Easy!)

Place the lid on the pot, and gently shake the pot back and forth over the heat. After a minute or two, the kernels will begin to pop. Keep shaking the pot steadily until the popcorn popping slows then remove from the heat. Do not wait quite as long as with the buttered popcorn, and once the popping slows remove from the heat. If you leave it on too long you can scorch the chocolate glaze.

If you have made both “buttered” and chocolate, you’ll want to mix them together. If your serving bowl is large enough, dump both of them into it and shake it around, either covering with a lid or using plastic wrap or aluminum foil to cover the bowl. If not, you can return all of the popcorn to the popping pot, put the lid back on, and shake it around.

Notes
This is purposely a movie theater style recipe. If you want to do a more homestyle buttered popcorn instead of using Flavacol, go for it! But this is the most true to Cinerama recipe I have managed.

Fortunately, it appears that for popcorn kernels and the chocolate glaze powder 1oz by weight also very closely equals 1oz by volume. So measure however you’d like.

You do NOT need extra salt here if you’re using the “buttered” popcorn recipe. If you aren’t, and you still want to do a mix, you’ll probably want at least a bit of salt on your buttered half.

Don’t heat your pot over too high a heat. You can easily burn the chocolate glaze.

The Mushroom style kernels are better for the chocolate glaze because they hold more of it. They are not 100% necessary, but they will provide a better end result than the butterfly style kernels for the chocolate specifically. For buttered, stick with your regular stuff.

If you’ve got a Whirlypop machine, feel free to use it. I don’t have one, and haven’t used one myself, but from what I’ve read they do fine with the chocolate glaze. Pop as you normally would, but again be cautious not to go too long with the chocolate to avoid burning.
Thanksgiving Recipes – Turkey, Cranberries, and Mashed Potato Waffles

Dry Brined, Sous Vide, Deep Fried Turkey Recipe

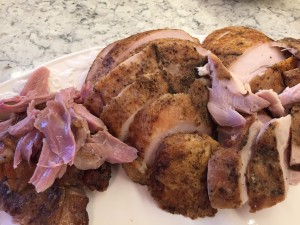
Dry Brined, Sous Vide, Deep Fried Turkey

Dry Brined, Sous Vide, Deep Fried Turkey

Adapted from recipes by Alton Brown and Michael Voltaggio.

Recipe for a ~14 pound turkey. Scale as necessary if adding additional turkeys or turkey parts.

Dry Brine ingredients (via Alton Brown):

  • 3 1/2 tbsp kosher salt
  • 1/ 1/2 tsp rubbed sage
  • 1 1/2 tsp dried thyme
  • 1 1/4 tsp whole black peppercorns
  • 1/2 tsp whole allspice berries

Turkey

  • ~14 pound turkey
  • 1 1/2 cups duck fat
  • 6 large slices of orange peel, from 1 – 2 oranges
  • 6 sprigs fresh thyme
  • 6 sprigs fresh sage leaves
  • Oil for deep frying (~6 gallons)

Equipment

  • Spice Grinder or mortar and pestle
  • Sous vide setup – immersion circulator and bath or other home made solution
  • Vacuum sealer and bags or large ziploc bags
  • Turkey Fryer or other deep fryer

4 to 5 days before serving

Combine all dry brine ingredients in a spice grinder or mortar and grind into a coarse powder. Set aside.

Disassemble the turkey into individual parts. If you’re unfamiliar with the process, a good video can be found here. Reserve wings and back for making turkey stock or gravy.

Arrange the breasts, thighs, and legs on two parchment paper lined sheet pans, leaving some space between each piece, and thoroughly dust each piece on both sides with the dry brine mixture. Store in the refrigerator, uncovered, for 4 days.

Day before or day of serving

Setup your sous vide rig to cook at 150F/65.5C.

Remove the dry brined turkey parts from the refrigerator. Place each turkey piece in a vacuum seal bag, along with 1/4cup of duck fat, 1 strip of orange peel, 1 sprig of thyme, and 1 sprig of sage leaves. Seal with a vacuum sealer. Place the breasts and legs back in the refrigerator.

  • If using ziploc bags instead of vacuum seal bags, use the water displacement method to remove air from the bags before cooking. To do this, seal the bag most of the way, then push the bag underwater until all but the seal is submerged. This will force out almost all of the air. Completely seal the bag.

When your water bath has come up to temperature, place the bagged thighs in the water and set a timer for 30 minutes. After 30 minutes, retrieve the breasts and legs from the fridge and place them in the bath. Cook submerged for an additional 2 hours – 2 1/2 hours total for the thighs, 2 hours for the breasts and legs.

  • If you are doing this step the day before serving, remove the bags from the sous vide bath and place in a bowl of iced water to chill for 10-20 minutes, then move the still bagged pieces to the fridge. 2 hours before serving, reheat the water bath to 150F/65.5C and reheat for 60 minutes.

About 70 minutes before serving, preheat the fryer oil in your fryer to 375F. This takes around 30 minutes. WARNING: deep fryers can be dangerous. Never leave one alone while it is heating or cooking. Recruit someone to watch your fryer while you finish prepping the turkey. Please consult your fryers manual for instructions on how to safely use it.

While the fryer is coming to temp, remove the turkey pieces from their bags and place on a paper towel lined sheet pan. Pat dry and remove any aromatics that are stuck to the meat.

When the fryer is at 375F, working in two batches, fry the turkey pieces for 4-7 minutes until the skin is golden brown and crispy. Evacuate the fried pieces to a clean sheet pan to rest for 20 – 30 minutes. After the first batch, let the oil return to 375F before frying the second batch.

  • I like to use the basket insert for my turkey fryer for this step. I put half of the turkey pieces in the basket, and SLOWLY lower it into the oil using the supplied hook. I start checking for doneness after about 3 minutes. When done, I remove the basket with the hook, let it drain for a few seconds back into the fryer, then move it to another sheet pan setup to catch any drips while I removes the turkey pieces. Reload the basket with the rest of the turkey, and repeat.

After the turkey has rested, carve as desired and serve.


Sous Vide Cranberry Sauce with Ginger and Orange

Ingredients

  • 1 package (~12oz) fresh cranberries
  • 1 cup sugar
  • 1 medium fresh ginger root
  • Zest of 1 medium orange

Equipment

  • Sous vide setup – immersion circulator and bath or other home made solution
  • Vacuum sealer and bags or large ziploc bags

Setup sous vide rig to cook at 185F/85C.

Peel ginger root using a spoon. Slice half of the ginger root until 1/4 inch rounds, and grate the other half using a microplane or other fine grater.

Place the cranberries, sliced and grated ginger, orange zest, and sugar in a vacuum seal bag and seal.

When the water bath reaches 185F/85C, put the cranberries in the water and place a dinner plate or other water safe weight on top of the bag to keep it submerged. Cook for 1 hour.

  • This can be done a few days in advance. If done in advance, take the cooked cranberries and dunk in an ice bath for 5-10 minutes to chill, then place in the refrigerator until ready to serve.

15 minutes before serving, pour the cranberries and their liquid into a small saucepan over medium heat. Gently stir every few minutes until the sauce has thickened to your desired consistency. Pour into a bowl and serve.


Leftover Mashed Potato Waffles

Ingredients

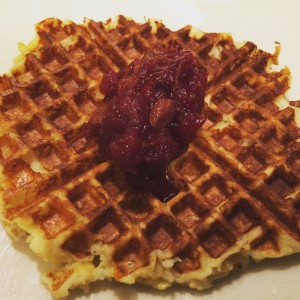
Mashed Potato Waffle with Cranberry Sauce

Mashed Potato Waffle with Cranberry Sauce

  • 2 cups leftover mashed potatoes
  • 1/2 cup grated cheese (I like sharp cheddar, but anything that melts decently and you have on hand will work)
  • 1/3 cup flour
  • 1 egg
  • Optional:
    • chopped turkey, bacon, crumbled sausage, or any other meat you’d like to experiment with
    • leftover stuffing (replace 1:1 for some of the potatoes)
    • Cranberry Sauce, gravy, syrup (for topping)

Equipment

  • Waffle Iron
  • Non-stick Spray

Mix all ingredients (except toppings) in a medium bowl until well combined and the mixture is the consistency of a thick cupcake or muffin batter.

Set your waffle iron to a medium setting. When it is preheated, give both sides a quick shot of non-stick spray, and place on a scoop of the potato mixture. Close the lid and cook for 4-5 minutes, or until your waffle maker signals it has finished. Waffle should be golden brown and crispy.

Serve with cranberry sauce, gravy, or maple syrup.

Heroes of the Storm!

WARNING! This is a post about video games. If that’s not your bag, turn back now.

I was very fortunate and was given access to the Heroes of the Storm alpha that’s going on right now! Not being a huge fan of MOBAs in general (I’ve played League of Legends, DotA, DotA2) I didn’t really know what to expect. I’ll have more thoughts as the Alpha progresses, but so far, it’s amazing! It takes all of the stuff I hate about MOBAs, and fixes them! This game surely won’t be for everyone. I’m sure a lot of DotA2 players will be annoyed by the absence of items, how “few” characters there are, and the different level mechanics. But this looks to me to be a gateway to that realm of gaming, much like Hearthstone is for CCGs.

More to come, but for now, if you’re interested at all in Heroes of the Storm, check out some of the streamers on Twitch and see what you think.

Lunches, my white whale

Call me, Ishmael? Please?

Call me, Ishmael? Please?

TLDR; skip to the bottom, I’m asking for some ideas.

“Call me Ishmael. Call me whatever you want, just don’t call me late to lunch!” Especially when that lunch is an awesome hot dog, or a jerk chicken sandwich, or fried chicken, or waffles! I may not be haunted by a giant, ghostly white whale that destroyed my ship and took off half my leg, but much like Captain Ahab I do have a nemesis: food trucks! For the last 18 months or so they’ve been coming to a few different locations at work, plying their delicious wares.

Now if you read my last post then you know this is a bit of a problem if I’m going to follow my 3 step plan for making everybody love me again! Oh…wait…that’s a different plan. We don’t talk about that plan. What I mean is, if I’m going to stop eating lunch from a food truck on a regular basis, I need a bigger harpoon.

This metaphor isn’t holding up quite like I’d hoped…

In this case, “bigger harpoon” means some delicious, minimal prep required once in the office, lunches.

(TLDR folks can start here.) I need suggestions for exactly this type of thing. What are your favorite things to make for lunch? I can handle a sandwich every once in a while, but those get old fast. I’d love some recipes I can make on a Sunday, and that I can use a couple different ways throughout the week. I’m cool spending a few hours on the weekend shopping/cooking, if it means I don’t have to get up an extra 30 minutes early to put something together. That’s pretty much a non-starter. Daddy needs his beauty sleep after all!

So what do you have for me, internet? Hit me! Links are awesome. Your secret, not-posted-anywhere-on-the-internet-but-in-the-comment-section-below ideas are even better! And they’ll stay secret, because lets be honest, nobody else is reading this yet 😉

© 2024 jessegamble.com

Theme by Anders NorenUp ↑